|
|||||||||
|
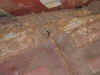
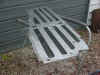
Rust usually starts from the top down in roadsters. My floors looked like this:
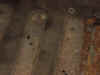
Another view:
To use any of the glue products, you basically need to have enough good metal to leave a 1" flange around the outside, so that you have a place to run a bead of glue. If your sills aren't in good shape this is not a good solution. If they are, read on. Since my floors weren't as bad as some, I elected to remove only the high ribs and leave all of the lower metal which was in really good shape
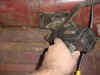
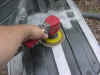
To do this, I used an cutter wheel on an air powered cutter, although you could use other tools, such as a cutoff wheel on a grinder, or even a metal blade on a jigsaw. Before undertaking this step take a look under your car and notice the location of the cross members, brake lines and other things that run under the floors. I didn't and now I need new brake lines. Also make sure you wear proper safety equipment, safety glasses and gloves are the minimum. Cleaning the old flanges to bare metal is the next step. I used a wire wheel on a grinder to remove most of the rust followed by some 40 grit on my DA to get it all shiny. My DPO had done this job previously on the left side, and used a ton of seam sealer. Unfortunately, the only way to get rid of it is elbow grease. I found that a heat gun softened it up enough to scrape, followed again by the wire brush.
Turning my attention to the new floorboards, because of the way I trimmed my car, I had to do a bit of cutting on them also. Anything that interfered with the old floor pans was removed,
And all the factory primer was cleaned off to give a clean metal surface for the glue to bond to.
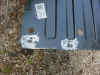
Notice that I used British Heritage floor pans. They come with the captive nuts for the seat rails already installed. Others, such as Steelcraft are cheaper, but you have to install the nuts yourself. After test fitting your panels several times to make absolutely certain they fit, apply a 3/8 bead of glue to the flanges using the applicator gun. Yes, you have to buy a special one and it costs about $50, still cheap if you don't weld. Since enough is good, more should be better, and I applied plenty. Probably wasteful, but these floors aren't going anywhere.
Place the new metal in place and use a few self tapping sheet metal screws to hold it in place while the glue dries, and you are done. Time to admire your craftsmanship and have a cold one. When the glue is dry apply some brushable seam sealer and reassemble your interior It took me about two weekends to complete what I anticipated to take about two days. What doesn't. I feel the floors will be there forever, so I painted the top and bottom with POR15. The glue fills the seams from within and should keep rust causing moisture and dirt out.
|
|||||||||