|
|
|
When you are checking wheel bearings you don't have to take the bearings completely out unless you see something wrong.cup".
When
you remove the spindle nut and pull the hub the outer cone will fall out.
To remove the inner cone you must remove the seal. Wipe the area clean with an
old rag and remove the seal by prying it with a large screwdriver. Note the
orientation of the seal lip in relation to the hub and always replace the
removed seal with a new one.
Clean and inspect all cones that mate to a good cup by wiping away excess
grease with an old rag and washing them in solvent. A convenient and safe
solvent for this, and several other jobs, is plain old cheap paint thinner;
often called naphtha or mineral spirits. Wash the cones in the solvent with a
small brush like a paint brush or parts cleaning brush and by swishing them
and rotating the caged rollers while submerged. When good and clean they can
be dried with compressed air, a hair dryer, or by simply letting them air dry.
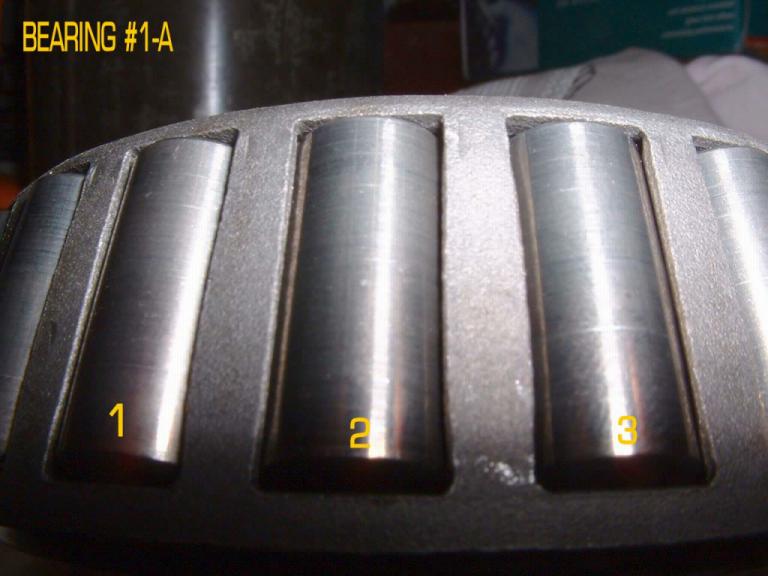
When dry, closely inspect all the rollers for any sign of pitting or
foreign matter pressed into the surface.
Now. If those bad bearings are not an example of normal wear, then just what the hell are they?
I'd like to note at this point that these
photos are of wheel bearings from my 1975 Travco Motorhome and they have a
total of only 33,000 miles on them. Never mind that they are not out of an
MGB, they are typical of the type and are bigger, and much easier to
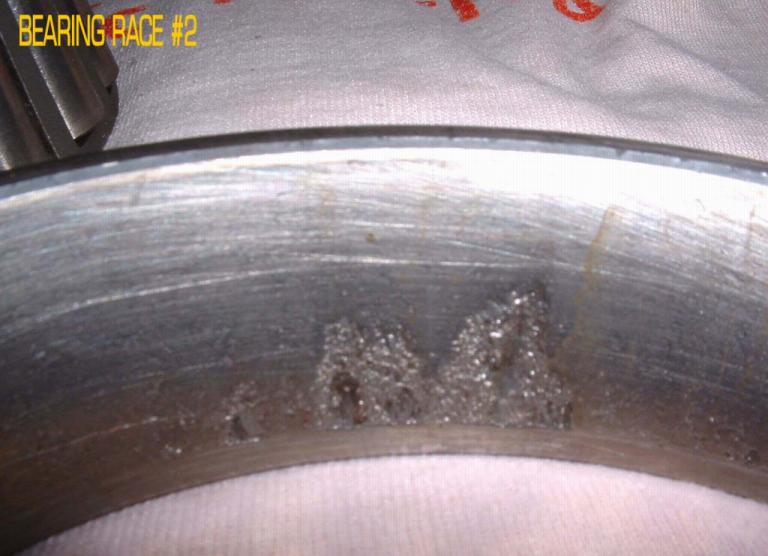
photograph. Only one out of eight wheel bearings was bad and the cause was
dirty maintenance procedures during a brake job, or perhaps, but not likely,
a faulty bearing installed at the factory. The bad bearing and race in the
pictures was the left rear outer and thee outers have a tendency to
fall out on the floor or into a dirty drip pan when removing the rear hub.
The other three rear wheel bearings run in the same 80-90 gear lube as it
and were all in good condition. That's why I suspect dirty maintenance lead
to it's failure. I fully expect the other seven bearings to run at least
100,000 miles more.
Note:ps are actually pressed into the surface.
Whether or not any bearings need replacing, wipe any excess grease out of the
hub, off the spindle, out of the cap that covers the spindle nut, and wipe off
the seal surface of the spindle. There's no need to wash any of these items.
In fact it's a good idea not to in order to avoid getting any grease on the
friction surfaces of the brakes.
In
the event you find a bad bearing you will have to remove the cup from the hub.
Lay the hub on a solid surface with the bad cone on the down side. You may
have to block it up with wooden blocks to allow room for the cone to exit the
hub. Look closely through the hub and you'll see the edge of the cup extending
slightly out of the edge of the hole through the hub. Many times there will be
two notches in that surface that expose nearly all of the edge of the cup and
that are there to accommodate driving the cup out.
Use
a medium hammer about the weight of a common claw hammer or smaller and a
punch to drive the cone out. Using moderate to light blows, alternate the
punch from one side of the cup to the other until it is expelled. Reverse this
procedure to install the new cup. This is a relatively slow process coming and
going, just be patient, the cup is moving with every blow and has to go
straight out and straight in or it won't go at all. When the new cup bottoms
in it's recess in the hub you'll note the sound of striking it changes from
dull to clear. That's how you know it is seated properly, listen for it.
Note: get a set off
the shelf, but will have to look up the seal.
To
pack the cleaned and/or new bearings requires nothing but the grease. You
should use actual wheel bearing grease available in 1 pound containers. The
brand name means little, the main thing is to get a grease that has a soft
buttery consistency. Black grease, containing Moly or Moly Sulfide, or
semi-synthetic grease is a plus, but not a necessity. Avoid so-called
heavy duty grease that is stiff and has a fibrous consistency.
Now
for the packing:
First get some grease on your finger and coat the inside of the hub. A moderate coating is OK, but it isn't necessary nor recommended to pack it full. Next wipe a thin coat on the spindle and a very thin coat on the seal surface of the spindle. If you are right handed put a small pile of grease in your left palm and take the large inner cone into your right, reverse this for southpaws. Begin pressing the most open side of the roller cage through the edge of the grease and against your palm. Repeat this until you have grease coming out the other side of the roller cage and keep turning and packing the bearing until the roller cage is full. Wipe a generous coat on the outside of the cone and drop in into the cone in the hub. Fill the edge of the bearing with grease to about the depth you calculate the inner side of the seal will reach. Remembering the orientation of the seal lip, (lip toward the grease), install the new seal. This can be done with light taps directly to the edges of the seal, but better to use a small block of wood across the seal to avoid damage to it. Drive the seal only to where it's outer side is level with the edge of its recess in the hub and wipe a light coat of grease on the sealing surface. Pack the outer bearing and lay it on a clean surface, newspaper or anything, near the spindle and install the hub.
MGB's
have a spacer and some shims that go in the hub between the bearings. Use them
if you must, but you don't have to. These items are engineering overkill, not
really needed, and not likely to fit properly with new bearings, so we'll
leave them out and do this like it's done on a billion other cars. Tighten the
spindle nut good and snug, rotate the hub or hub/wheel assembly a couple of
turns, back the nut off until slack, and re-tighten lightly.
If a cotter pin hole lines up with the slots in the nut you're set. If not tighten the nut ever-so slightly and check again, if the pin will go in, do it. If still not back the nut off until it will. Give the hub/wheel a couple of turns, press/shake it sidewise and up and down to detect any looseness. No looseness? Bend the cotter pin to secure it. Looseness? Remove the pin, tighten the nut to the next slot. Some spindles have two cotter pin holes, one vertical and one horizontal. Look for this and use whichever one makes the hub fit best.
|


|
|