|
|
| RELOCATING FUSE
BLOCK
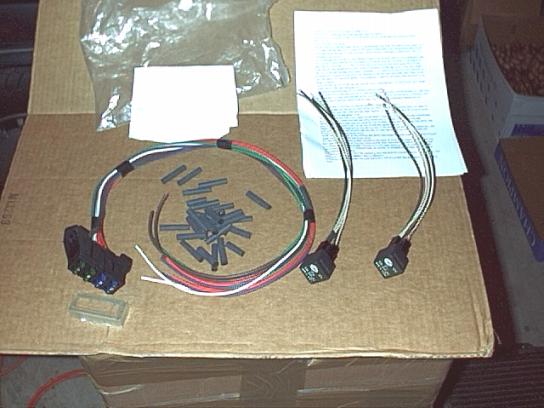
Wiring is an arena into which I've never ventured too far. This modification will be my first big wiring job. To refresh your memory: I plan to replace the original Lucas fuse block with a modern one using plug-in fuses; and, at the same time, I'll relocate the fuse block to under the passenger side of the dash. I also plan to replace the Lucas starter and ignition circuit relays with modern plug-in Hella relays. That means cutting and splicing wires! Lots of wires! Ian Pender sells a kit designed just for that modification. So, I bought one. Here's what I got:
2 Hella relays w/about 1
foot of MG-color coded wire Before I started whacking up my "virgin" wiring harness, I
contacted my friend Wray Lemke of Charleston, South Carolina. Wray has
been playing with electrical stuff since he built his first radio when he was
eight. He's owned his own electronics service company for 22 years, and I
don't even know how to spell all the electronic things he's into. He's
also a citizen of MG-dom. |
"You can go with Lucas connectors for splicing, if you have the correct crimping tool; or solder splice them, then heat shrink. "To go the solder route, go to your
local industrial electronic supply house and buy a butane soldering
iron, either the Master Appliance or the Weller. They're both made
by the same manufacturer. Get the self-igniting one. It's
about $100, and is money well spent. Don't buy a Radio Shack
'u-light-em' type unit. Also, pick up a few sticks of the good,
flexible heat shrink, not that stiff crap. You'll need 1/8",
1/4", and 1/2". "Shrink Wrapping: If you have enough room, you can slide the heat shrink, that you've pre-cut, over the wire before you tin it. But otherwise wait until it cools, then slide it over. If it's too close to the joint, it'll shrink from the heat transferred down the wire. Keeping it 6-8" away from the joint should be ok. Oh, your shrink should extend about 3/4" past each side of the joint. When I do a splice on a two wire unit, like the front turn signals, I slide my small shrink on each wire and then slide a bigger piece on that will cover both. I use the iron heat to shrink the small ones, then slide the big piece over them and shrink it. "A small vise, maybe even a Panavise is helpful at this point if the harness is out of the car. It's much easier to make one wire stationary and hold the other up against it when soldering. Get the two positioned, then drag the tip of the iron across both of them at the same time. The solder should flow. A cold, tacky joint is worse than a butt splice. That's why we always pre-tin the wires; we don't have to hold the wires, the iron, and the solder at the same time. "If the harness is still in the car,
the most frustrating thing to do when soldering is trying to position
the two floppy wire ends together so they lay along side one another
when you solder them. One thought is that you could take a length
of #10 or #12 solid bare copper wire (strip some Romex) and solder or
crimp a little alligator clip lead to it. You could use this to hold one
of the wires steady by wrapping the #10 around a convenient point in the
car or use, as I have, a set of vise grips clamped to the #10 as a
base. You can then move the clip around until you can position it
to hold your work at the best angle. That leaves you holding a wire with
one hand and the iron with the other. Remember, though, to always try to
brace the hand holding the wire to steady it. "You
could also leave a small service loop coiled up, maybe one or two turns,
behind the fuse block out of sight, should you need it later. We
always leave a service loop, and have had other service companies call
us and thank us for doing it when they had to work on the equipment. "Badda-Bing,
Badda-Bang...yer smokin." |
|
|
|
"Tape over all the 'solid' original tape you can. This helps keep all the 'Y's' where they belong. Get all the wires into the groups they'll end up in. Start at their 'roots'. Get them straight, and tape them together every six inches or so. "Start taping at the grommet and when you reach a 'Y' make a quick lazy spiral out to the end of the shortest branch. Make a couple of tight turns and tape your way back to the 'Y'. When you reach the 'Y' make several tight wraps in several directions in order to fill the crotch and continue out the long branch. Continue out the bundle until finished and you won't have any place for an end to come loose because you've done the whole bundle with one piece of tape. "When that job is
finished double the long wires back toward the grommet until you have a
bundle about three feet long. loosely tape that, wrap it well in plastic
sheeting, and tape that up good. When you get ready to paint run a wire down
from a rafter or anything somewhat higher than your head and attach that
to the end of the bundle. Use the wire to suspend the bundle at about a 45
degree upward angle pointing toward the left headlight area and it will be
completely out of the way while painting" |
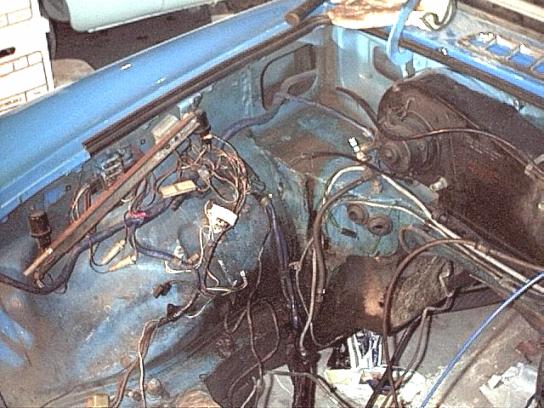
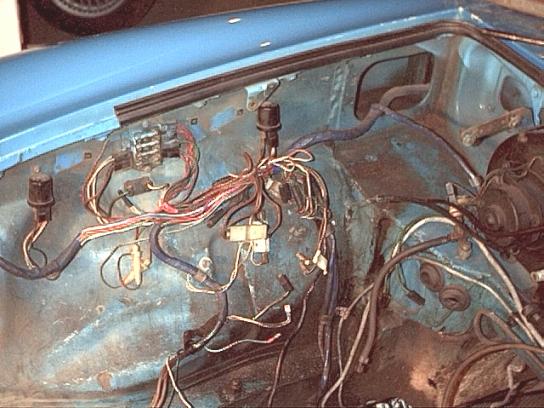
Well, that seems easy enough. So, here we go... The first thing I have to do is cut the wrapping off my harness around the fuse block. Wow!! Scary!!
BEFORE AFTER You'll notice there are some differences in the 2 photos other than removal of the harness' blue covering. The air conditioner clutch relay hidden up behind the hood stay is gone as I don't plan on air conditioning this car. The hood prop is also gone; remember, I'm using a custom fiberglass MGC hood so I'll change to its hood prop later on. Man, that harness looked so nice and now looks so messy. Additionally, you can see where, over the years,
I'd replaced the Lucas electronic ignition with a Crane unit without really screwing up
the wiring (the Crane unit went when I removed the 1800 engine). |
 |
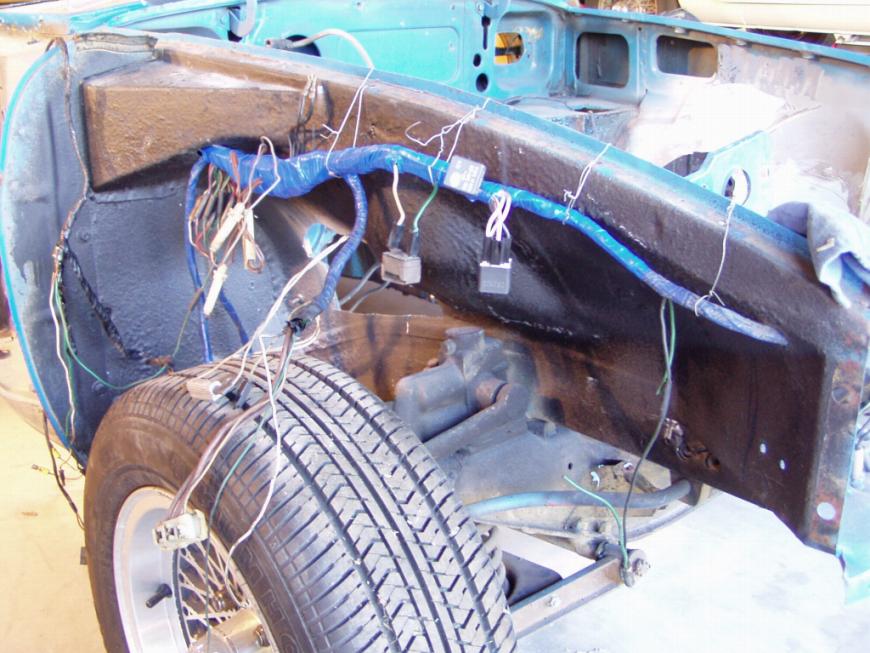
Earlier, I had grafted an opening from the driver inner fender of one of my parts cars to the passenger inner fender of my V8 car. The interior openings in the passenger fender now mirror those in the driver fender. It is though these openings that I'll run the wiring harness and pull hot air from the engine compartment. |  |
"But, why 1-3/4" ?" you ask.
Simple. That's the same size as the hole through which the harness
comes through the firewall. So, the same size rubber grommet will
also fit the new hole. |
 |
Here's the final harness all taped up with nice blue tape and hanging temporarily from small pieces of wire. You'll notice there's no fuse block. And, you'll notice the harness is larger than normal. That's because the fuse block has bee rerouted under the dash and replaced with Ian's new fuse block. You'll also notice the Lucas relays have been replaced with the modern Hella units I got from Ian. |
Next weekend, I'll make small hangers to permanently attach the harness to the top edge of the inner fender so the bolts or rivets won't show from the engine compartment side of the inner fender. I'll also relocate the rear wiring harness from under the car to inside under the carpet ala the RV8. Why? Well, since I'm running dual exhaust, it just seems prudent to get the wiring inside and out of its way. |
 |
The new, modern fuse block hanging under the dash in the general vicinity of the glove box. When the dash is reinstalled and the wiper motor secured to the firewall, the fuse block will be permanently mounted. |
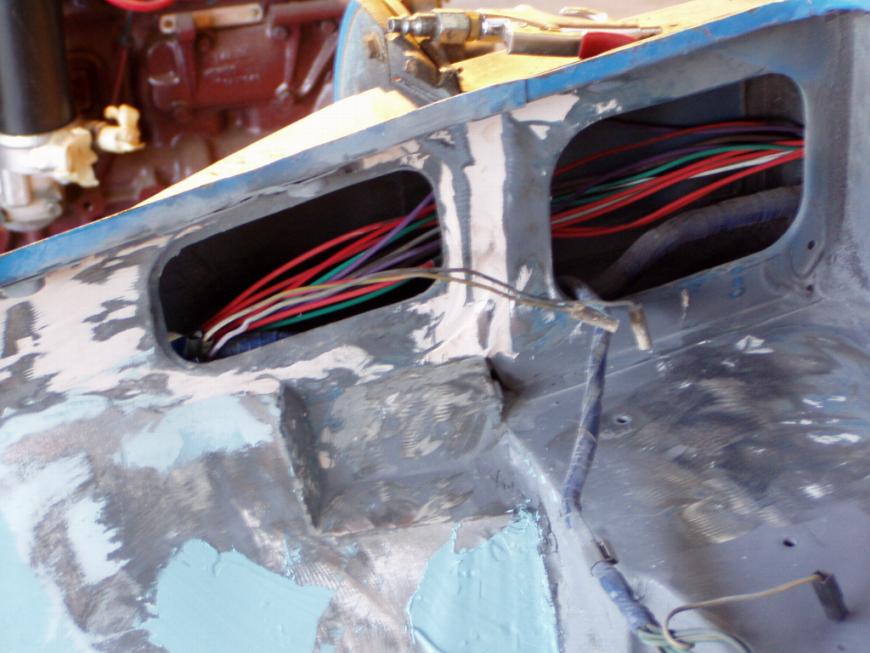 |
If you look closely
at the bottom of the large opening to the right in the photo, you
can see the original wiring harness making its way forward.
The loose wires (not yet incorporated into the harness bundle) are
the new wires needed to move the fuse block from it forward engine
compartment location to under the dash. They are why the
harness looks `so large in the earlier photo. |