1970 MGB GT Body
Preparation/Painting
![]() As
of: 23 January 2002
As
of: 23 January 2002 ![]()
After stripping the little car to a bare rolling shell, she went to the sandblaster for removal of all old paint. There we found that she was rust free (other than a little rust in the passenger floor which we immediately replaced) and had never been seriously damaged. Her entire butt had been replaced in the past but it was a superbly professional job that will require only a skim coat of bondo at the joints; she had been hit in the front on the passenger side but, again: well done repairs.
She was then taken to the body shop for final preparation and new paint.
![]()
![]()
![]()
![]()
(17 October 2000--in body shop)
Well, she's coming along slowly. But, I like it.
This place knows how to restore a car!!
And, they do it while they also complete insurance jobs and accident repair. One group of body men work on the "fast jobs" while a small contingent of master craftsmen tackle the restorations and special projects. And, those can't be rushed.
Car owners are invited to stop by any time we want and visit our babies. The body shop owner's son is kinda in charge of us, and he always comes over to visit and answer our questions. Heck, he'll even call our body man over to go over what he's doing on our car. Usually, one master craftsman is the lead on several cars with helpers to do the menial labor. The neat thing is that they told me I could stop by and help hang doors and fenders if it made me feel better!!!
The body guy is taking each panel and working it as he goes around the car for the first time. Simultaneously, he's pre-fitting lights, emblems, and trim; and, he's ensuring all original body seams are present and as straight as when she left Abingdon.
I learned something with this restoration: sandblasting creates a whole new set of circumstances! After a car has been sandblasted, each panel has to be smoothed and checked for straightness. Luckily, none of my panels were distorted by the blasting, however, to ensure smoothness and a perfect fit, we're metal etching each panel and going over it with a fine tooth comb.
While the sandblasting revealed the little car had no rust, she had been involved in a few fender benders over her 30 year life, notably a punch to the left front fender and a smack directly in the butt. Luckily, the previous body work was superbly done so we don't have any nightmares with which to contend. The pop in the butt had been remedied with a new rear valance though it was not correct for the split bumpers. However, we will solve that (license plate mounting holes in wrong place) with a little welding.
So far, the body man has drilled all the pop rivets holding the side moulding clips, worked the right rear quarter panel, started working the engine compartment, pre-fitting front fenders, and started working the rear valance.
![]()
Passenger side with the smoothed and primed quarter panel and the front
fender pre-fitted. Note that the side marker lights have been shaved for
the smoother pre-'68 look.
(Yes, that is a 1957 Chevrolet you see in the background. Also in
the shop is an early fastback Barracuda, a '50's Ford pickup, an early Mercedes
sedan, and a 1949 or 1950 Ford coupe.)
The doors and front valance are laying on saw horses behind the car as they will also be gone over to ensure smoothness and no distortion. The hood and fenders are kept in a bin until needed.
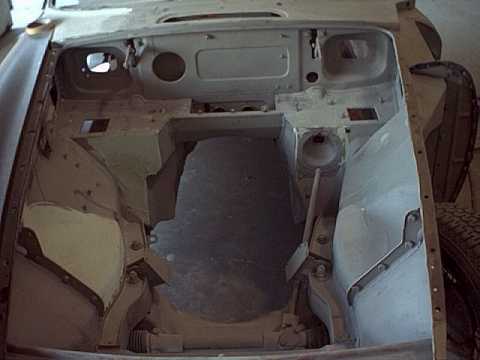
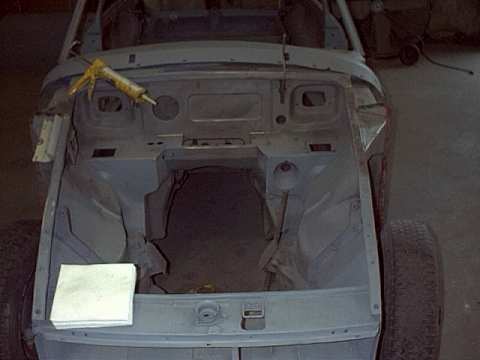
![]()
![]()
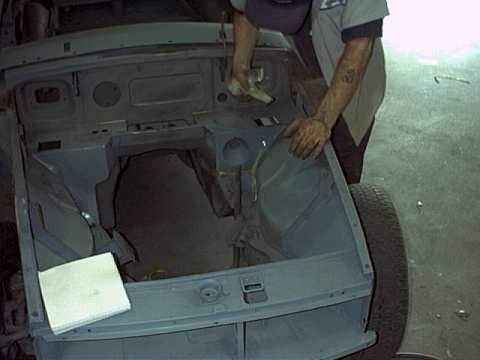
Engine compartment being prepped by having all previous owner
modifications corrected. (You just know someone has to drill a hole
somewhere its not needed!!)
As he continues around the car, the craftsman will hang, smooth and straighten every panel. Then, all removable panels will be taken back off the car so the undersides and hidden parts of the body can be painted. Finally, the car will be reassembled and sprayed its final color; in this case, Glacier White.
31 October 2000
When earlier body repairs were made to correct accident damage, a new rear valance was welded onto the car. The work was done superbly except for one minor problem: the body man didn't keep the valance panel roll from hatch to bumpers, he let the panel flatten out. By that, I mean that the panel didn't have the arch it should have to complete the smooth contour of the hatch down to the bumpers.
![]()
![]()
Rear valance
That really didn't matter so long as the license plate was in the center of the panel above a single bumper blade. However, since we're going back with the original split bumpers, panel roll becomes important to the rear aesthetics of the car.
So, we're having to reform the vertical roll from hatch to bumpers (by the way, the taillight to taillight roll is perfect).
![]()
Rear of car with valance panel roll reformed in fibreglass/bondo before
primering. Note that the indentations for the back-up lights have been
kept as have the body seams under the taillights.
Next, we'll pre-hang the split bumpers to ensure the bottom edge of the panel is straight and that the contour of the hatch continues naturally to its cutoff point at the bumpers. We'll also drill the tag mounting holes between the split bumpers.
At the same time, we're smoothing the driver side quarter panel (just as we did the passenger side), shaving the side marker light for the cleaner pre-'68 look. All rivets used to hold body molding to the car will be replaced with new ones.
![]()
Passenger quarter showing the shaved side marker light pre-1968
look.
Well, things have moved slowly over the past few weeks but the doors, fenders, & hood are now pre-fitted (for alignment purposes). Also, the entire body has been worked for smoothness. At this point, the body is about ready to accept paint even though the front valance and the bumpers still have to be test fitted. (Oh, in case you're wondering: we didn't sand blast the hood since it's aluminum & we want the paint that's already there as a base for the new paint.)
![]()
![]()
![]()
![]()
As you've seen in previous photos, I used new pre-'68 front fenders without side marker lights. When we went to test fit the front valence and hood, we found some minor panel alignment problems. A closer examination of the car showed that, at some time, the bonnet lock platform had been replaced. We couldn't find any evidence of body damage anywhere else so we're assuming the car took a hit to the grill itself necessitating replacement of the panel.
Unfortunately, when it was replaced, the corners of the fenders were pulled in just enough that one corner of the hood rubbed a new fender; it didn't rub the old fender--just the new passenger one. So, we removed and replaced the bonnet lock panel. That solved the problem, and allowed all body panels to be test fit.
Once everything is aligned, & the grille and bumpers test fitted, the car will be disassembled again so the undersides of fenders and the interiors of panels can be painted Glacier White. Then, the car will be reassembled for its final spray.
Car is undergoing a complete sanding right now. Then metal etch will be applied & sealed. Afterwards (this week, we hope), it goes into the paint booth along with its loose doors, fenders, hood, hatch ,valance, and minor pieces for "cutting in".
Finally!!! Yes, the car is receiving its final priming/spackling in preparation for paint!!! I know, I know...I said that 3 months ago...well, here's the typical problem with body shops & long-term ground-up restorations: they put restorations aside to take care of insurance jobs that pay the bills; I was aware of that up front as the owner explained the process to me as I was going into this whole thing. In my case, he always asked my permission to do so...&, every week when I stopped by to check on progress & he needed to ask for a delay, he had a Corona Light for me!!
Well, all the sanding is finished, and the last bit of bodywork is almost complete: going over every seam in the body with a good 3-M seam sealer. This is one project that takes time and patience as the photos attest. However, with a car that's been sandblasted, its imperative that this step is done correctly. Its a labor intensive process that can get out of hand.
![]()
After the seam sealing is completed, the car will get a final coat of etch primer and then the heavy primer before going into the paint booth.
All my fenders, doors, hatch, hood, valance--in other words: removable body panels--are actually over at the paint booth for cutting in (painting the back sides) prior to going back to the car for installation. Things are beginning to move again!! (You know, this car's been in the body shop since last September!! 8 months so far. But, she'll be beautiful when she's finished. Jerri asked me the other day, "Are you building me a grocery hauler or a show car?" I couldn't honestly answer her.)
![]()
![]()
![]()
![]()
![]()
![]()
Boy, she looks great.
While they were "cutting in" the undersides of the fenders, valance, doors and sills/jams, trunk & hood areas along with any exposed areas that would be covered after assembly, they also sprayed the entire car. I'm glad they did. After the white paint was applied and the car was under bright lights, we found a small dent on the roof, a small indentation on one of the new front fenders, and a place on a quarter panel that had a little wave.
Those places will be repaired & primed; then, she'll be reassembled and repainted once more. What a beauty she's gonna be. The racks on which the individual pieces are hanging were what they went through the paint booth on. Just barely discernable in the background of some of the shots is an old Chevy pickup that's also disassembled & freshly painted. It's a "for show" street rod, & its pieces are hanging on another set of racks.
Oh, the guy in one of the photos is the master body man who oversaw the entire process. It was through his tenacity that they're rolling her back into the paint booth even though she's completely painted. Seems that painting the entire car isn't something that's normally done during the "cut-in" process of a "streetable" car. Usually, they roll 'em in to spray the areas that will be covered after assembly but don't spray the entire body until reassembled. That's something saved for show cars like the old Chevy truck. (I told Jerri they were turning her little '70 GT into a show car. Her answer, "That's nice. I'll have something to show the kid who loads my groceries at Kroger on Saturday mornings.")
29 June 2001: Wow!! She's reassembled & they're going over the body once again, correcting any small defects before the final trip through the paint booth next Monday. In one photo, you can see where they found the small dent in the roof after she was painted the first time.
![]()
![]()
![]()
Also, went by Norm's Upholstery Shop & made an appointment for next Tuesday. Norm has a room in the back of his shop where he puts projects like this, an out-of-the way, 1-car spot where only the installer is allowed--no lookers from off the street!! He's real careful with cars that have fresh paint & are collector items (not that he's not careful with all cars). Norm said he would personally install the headliner and all the interior vinyl trim pieces that must be in place before the windows can go in. Then, its off to the glass shop & then back to my garage for completion. (Jerri's already talking about driving it "daily", but I think she's saying that just to annoy me.)
5 July 2001: Tuesday, July 3rd dawned like any normal July morn in north Alabama. The sun burnt off any lingering morning dew as temperatures quickly rose to the mid-80's, and there were tiny tufts of clouds drifting overhead.
But, this wasn't a typical summer Tuesday. A friend & I were building a rifle range at our local high school for the JROTC rifle team that had just placed 9th in the nation at the Junior Olympic Games; I was making a presentation at the North Alabama British Motoring Society's monthly meeting that evening;and...
...for the first time since October 16, 2000, Jerri's '70 MGBGT was going to see sunlight!!
Yep, you guessed it. The body work and paint are finally done!!! She's Glacier White!!!
As the afternoon wore on and we got the interior walls finished and ready for the electricians, I rushed home for a quick shower and to grab my truck & trailer. It was sweltering. I stopped for a soda at a friend's store and he commented that I looked like I was having a meltdown.
Around the time when I would normally leave for our club meeting, I got to the body shop. We rolled Jerri's car out into the sunlight, and--man--did that Glacier White paint shine. A total of 7 coats of polyurethane with clear integrated into each had definitely done what Jerri wanted. You need sunglasses to look directly at her (the car, not Jerri--though I've gotta admit, Jerri still looks as good as she did when we were married back in 1969!!!).
We loaded the car on the trailer...
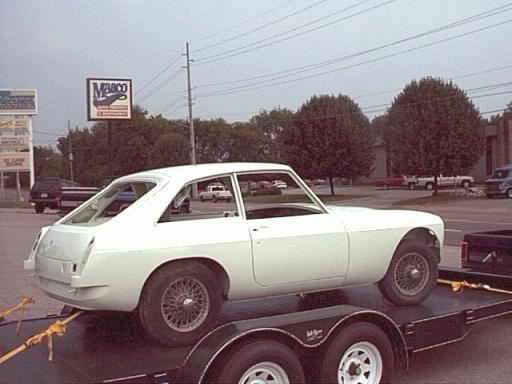
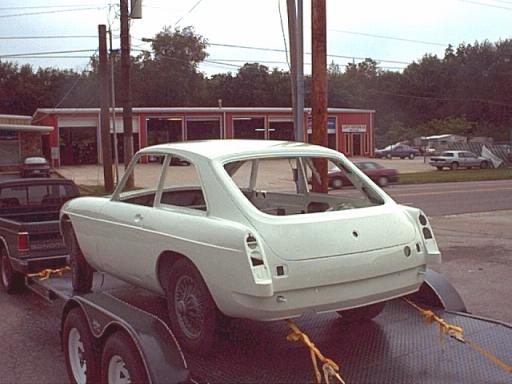
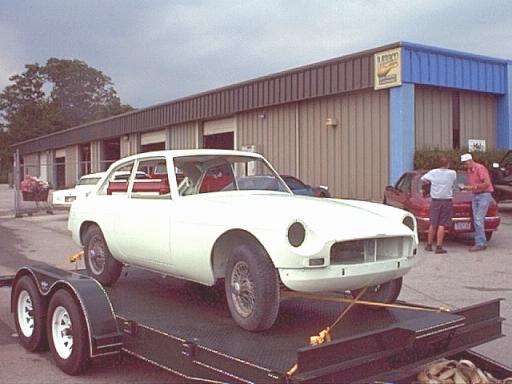
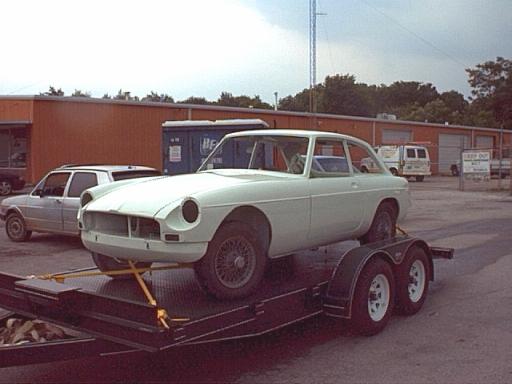
...and, I headed out to the club meeting, bodyshell in tow.
Then ,it happened: RAIN!!!
It seems that every day this summer we've been blessed (?) with rain. Unfortunately, this particular Tuesday afternoon the powers that be chose to demonstrate their authority over mankind with a "gully washer" lightning storm. Every gutter was filled to overflow; streets looked like streams rushing down from the mountaintop; and, my just completed car was soaking wet!!
Nothing to do but keep on trucking. Funny thing though. As we neared the restaurant where we hold our club meetings, the rain stopped, the sun shone through, and the car was completely dry by the time I pulled into the parking lot for the usual tire kicking confab before dinner.
....oh, if you looked closely at the photos, you'll see "the rest of the story" as a famous radio personality is prone to say:
The bodyshop that's been working on the car for 8 months is our local MAACO franchise!! Yep, you'd never believe it, would you? MAACO in Huntsville does custom work. And, it'll rival any custom body shop anywhere!!! The owner & his son are really neat car guys. They enjoy a challenge every now & then. From there, she goes to the upholstery shop where the interior is prepped for the windshield & hatch glass; you know: all the vinyl pieces that are glued to A, B, and C posts; new headliner & sun visors; and, the vinyl covering the shroud top panel between the windshield & the early steel dash.