JDW'S
"BODYWORK 101"
![]() As
of: 4 September 2003
As
of: 4 September 2003 ![]()
"Not everybody can afford the big air compressor and special tools associated with this kind of work for what may be a one time job. I'm into my third full restoration and sixth paint job, and still prefer to keep it simple.
-JDW
_____________________
- Lesson
1-
Prep Work
| |
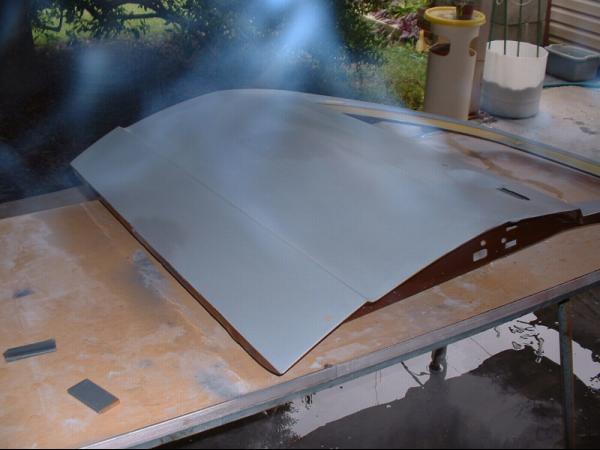
The door in this picture has been rough sanded and primed with DuPont #131S "Fill 'N Sand" acrylic primer surfacer. Professionals hardly ever use this any more, it is now considered archaic; but, it's economical, effective, safe & easy to spray, works well for me, and I prefer it. |
The sandpaper you see
on the right edge of the door is 180 grit dry production paper wrapped tightly on a ten inch piece of paint
stick. Sanding lightly, using long multi-directional strokes, will point out
high spots as well as low ones.
______________________
| |
This door had never been damaged
and worked out very easily. By using a long stick with long
multi-directional strokes a high area was found by the time all the
pencil marks were sanded out. The yellow and brown area was only about
as thick as a good layer of paint & was higher than it should have
been. That's plenty enough to show a wave in a finished paint job. The
two small silver areas are where I went to bare metal to know exactly
where I was in this process. When I saw metal, the discolored area was
blended to the primer, and all pencil marks were gone. Then, I knew it was
perfectly flat.
|
______________________
The right side of the vehicle had taken a moderate hit in this door, the door jam, and an area of about 18" behind the door. The repairs had been quick and sloppy with lots of "Bondo". So, the job began with removing excess body filler while the door was still installed so it and the area behind could be contoured and fitted at the same time. About 10" of door jam had to be re-fitted to the door with fiberglass reinforced body filler. Reworking a botched job is harder than doing it from scratch.
|
Stick sanding revealed a couple of low
areas and a high spots. The ones that are circled, (showing bare
metal), were sharp little peaks. There's only one way to
remedy that: I tapped them down with a small hammer and proceeded
to the next step.
|
______________________
|
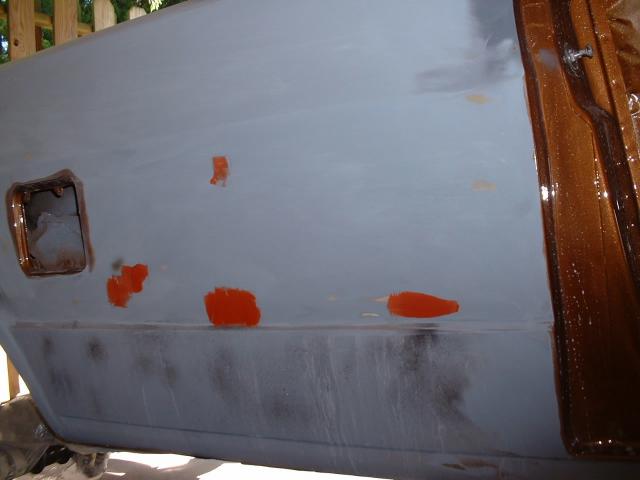
Close inspection of the smoothly sanded
door revealed 10 flaws which were circled with the lead pencil as they
were found. The 5 spots near the edge were no more than pin holes, but
they look like gopher holes in a finished paint job; and, usually, no
amount of primer will completely fill them. Always apply filler to an
area somewhat larger and thicker than what the flaw seems to be so it
will "feather in" completely with the first sanding.
The filler used here is Dynatron #592
"Putty-Cote" and is the best finishing putty I have ever
found. It is very soft and "skimable", leaves no air bubbles,
no tackiness on top, sands and featheredges like a dream. It can be
applied to bare metal, sanded paint, or scuffed primer with equally good
results.
|
JDW's NOTE: When mixing body filler I never use more than half the recommended hardener; the same goes with fiberglass resin. It doesn't matter how little or how much hardener you use, the putty will cure to the same firmness and consistency when thoroughly mixed. Using only a little hardener gives you more time to work and conserves material that would otherwise begin curing before you're finished with it.
______________________
As the filler cures it goes through a heating period and is ready to sand when cool to the touch with the backs of your fingers. I mix filler on discarded snap-on coffee can and plastic ice cream container lids. They get trashed anyway and sometimes you can bend them and, the cured filer pops off so you can reuse them. Besides, they have two useful sides.
|
The little Ryobi 5" random orbit
sander is the best thing I've ever bought for body work; handy
as a pocket on a shirt. I work
filler, rough sand paint, and even remove paint to bare metal in
small areas with it. I've used this one for 8 years and the best discs
I've found are at Sears. They are yellow on the abrasive side, cloth-like
on the back, and tougher than a
cheap steak. The only ones you
need in body work are 60-grit so save your money and don't buy the
variety pack of discs.
By the way: The little wire brush is for cleaning out the 180-paper. It fills real fast, but will last 10 times longer if you clean it every little bit.
Don't attempt to power sand to a finish.
Just take the top down flat and leave an edge around it about the
thickness of a match book. With the meager equipment we have and the
skills we possess power is for roughing and elbow grease is for finesse.
Try powering to a finish and you'll usually end up having to repair what
you screwed up.
|
______________________
You can get a little better look at the stick sander in the below photo. The 180-grit sandpaper is wrapped tightly around the stick and as you use up a section you tear it off and begin working with the newly exposed paper. You can even sand with the edge of the stick which works real good along the insides of breaks like run the length of these doors. The little wire brush is for cleaning out the 180-paper which fills with residue real fast. Cleaning it every little bit makes it last 10 times longer.
|
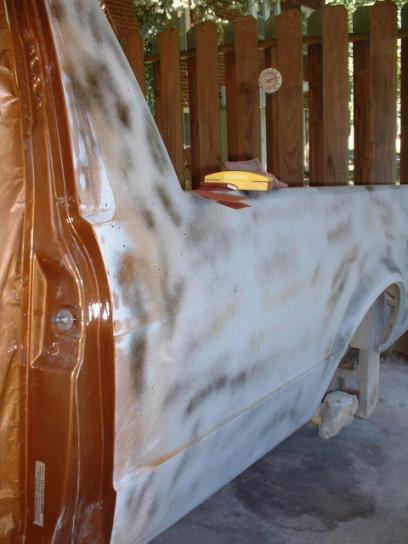
You'll notice in this picture that the stick
picked off more high places than seen in photo #3. That's because when
I picked out the low places I stopped sanding and filled them before
going further; it just saves work. Notice how the newly applied filler
and discolored areas all feather into their surrounding areas. Now is
the time to "feel it out". If the door and/or your hand is
dusty so your hand slides over the surface as if lubricated you're
ready to go. If you feel any resistance as you rub your hand over the
surface put a thin rag, like old bed sheet or t-shirt material, under
your hand. Now, slowly run your hand over the entire surface in all
directions. You can feel flaws you can't see at this stage, so feel 'er
up good. If you think you feel something, take a damp cloth, run it
over the suspected area and get down at a shallow angle for a good
look. If you see something, circle it with the pencil, cross hatch the
area with pencil marks, and go at it with the stick sander 'til it
lines out or you have to skim in some filler. NEVER try to sand out a
low area. If you can work a high area surrounding it down to it's
level that's great, otherwise skim some filler in and go at it again.
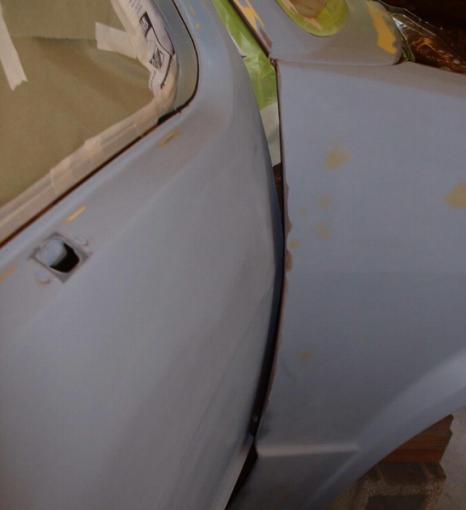
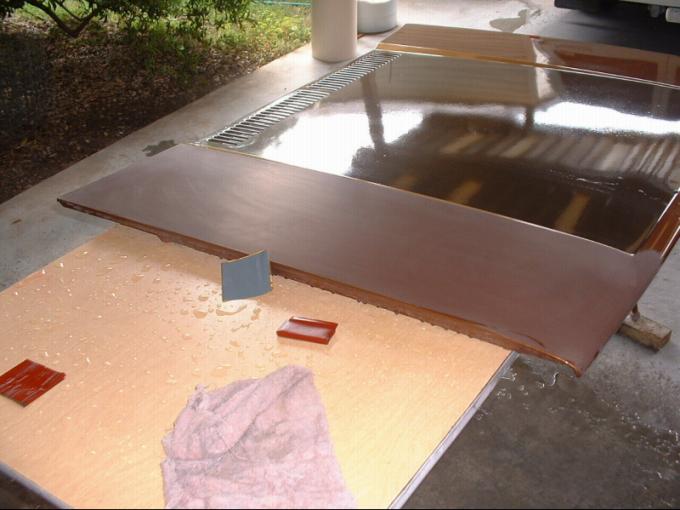
In the picture the white spots are the Dynatron we put in, pink is filler from the original botched repair, red/brown is primer from that repair, yellow is original paint, and mustard is Vari-Prime self etching primer immediately under the gray primer. When you can't feel any flaws, especially in these areas, you're finished with this step. |
______________________
Aerosol primers are OK for doing small areas and avoiding the mess of mixing for, shooting with, and cleaning up a spray gun. The Sherwin Williams GBP # 988 is the best self etching aerosol primer for bare metal I have ever found. Spray it in a well ventilated area and avoid breathing the fumes. It smells just like DuPont Vari-Prime which is referred to by many professional painters as "Yellow Death". It's hot stuff, so shoot a little, step back, watch which way the overspray drifts, and stay clear of it. You may well ask, "If you know so much about how these so called lethal materials smell; why ain't you dead?" Well, I don't know. Maybe the cigars and cigarettes I smoke protect me from it. Just don't take a chance with your health and stay out of the fumes.
|
There is still a tiny high spot
right in the middle of the Dynatron beside the cans. It's no thicker
than one coat of paint and, although you can't see in the photo,
feathered nicely. About 4 coats of primer filler on that area along with
careful sanding and it will never show.
|
______________________
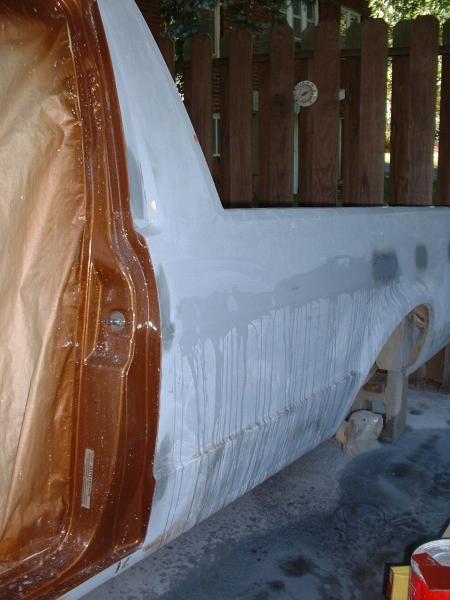
| The darker gray areas are where I covered bare metal with the self etching primer. Use it sparingly, only enough to get coverage on the bare metal areas; using any more is a waste of it and it ain't cheap. These doors are now ready for, (actually in), final primer. I used the same primer filler as in step one, but you can use non-sanding primer at this stage if you want. I prefer the added insurance of that little extra thickness of primer to work to even at the expense of it being more labor intensive. It's best to spritz on a very thin showing, (not even a coat), of black aerosol paint then block and/or hand sand with 400-grit paper. This is performed as a wet sanding and is done with a deft touch. Great care is taken to "pet and coax" the surface to well sanded perfection with no flaws or sand-through. If you find a flaw or sand through, re-prime and pet it into shape. |
Color coat painting; that's a whole 'nother story that I'll not get into because I learn every time I do it. That step is something you can do or you can't, there's no in between, and if you think you can't, take it to a pro.
======================
![]() - Lesson 2-
- Lesson 2- ![]()
Sanding Jamb Areas
Nope! Not when it comes to cars.
'Jambing' a car is somewhat different than 'jamming musicians', and if you call wearing your fingernails down into odd shapes, poking little holes in your fingers and hands, and generally working your fingers to the bone fun, you'll enjoy SANDING JAMB AREAS.
Jamb areas are around door jambs, door edges, the bottom of the hood, the engine bay, and all the places that must be jambed-in (painted) before you shoot the overall color coat. It' a major portion of what that two or three grand you drop on a body shop goes for. Most of what you buy is "grunt" work. The actual color coat paint, hardener, reducer, and clear coat, (if you use a two stage system) costs maybe $400.00, depending on color and paint type, and the painter himself spends only about an hour with your car.
Before that comes, however, all the grunt work.
| Every nook and cranny you see in this photo--and plenty you can't--has to be sanded before you paint. It is imperative that nothing be missed or the finish coat will not have a solid foundation to bond to, and will begin to peel off in a year or so. It took about six hours to work out the areas you see here. The underside of this hood took about three hours before I was satisfied with it. Nine hours for the engine area alone seems like quite a while, eh? |
Well, boys and girls, that's after degreasing and scrubbing all that, sanding the original finish, and priming it to the point you see here. That puts it at no less than eighteen hours multiplied by the body shop rate because most under hood areas easier to work than this one.
How much money can you save by doing it yourself?
Go figure. Wait, there's more.
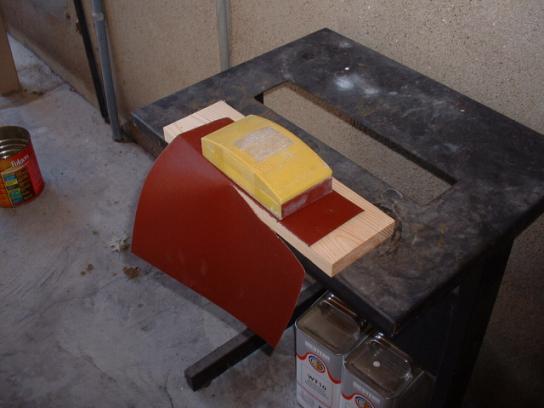
About all you need for jamb sanding is a couple pieces of 3M # 7447 Scotchbrite pad, some 320 dry paper and maybe a piece of 180 dry paper. Scotchbrite pads seem handier if cut into 3 or 4 pieces.
| The pieces you see here are
1/3 of a full pad. The waded up
"worn out" piece is far from worn out. That stuff never quits
working and you can use it until it wears away to nothing. You can get in
the tiniest crevice, it cuts fast, and doesn't produce any deep scratches. You can
wad it into a 1/4" wide weather-strip channel and have it sanded in a
jiffy.
Notice the 320 paper looks like a small square. It is actually 1/3 sheet folded in thirds. Whether you're dry or wet sanding the paper is easier to work and control when folded in thirds and you can end up using every bit of the paper when folded this way. |
The Scotch-brite alone works well on most surfaces, but when priming into many of these type areas they'll always be some blow out and stick to surfaces in a nearly dry state. You'll feel where they are as soon as the Scotchbrite hits them, they feel kind of like sandpaper.
Grab the 320 give the area a couple of swipes, the nibs are gone, and go over it with the Scotchbrite to retain a uniform surface. If you happen onto a run, you can knock it off quick by finger sanding with the 180 then hit it with the other two.
 |
This is so basic that I've never seen it
in a painting article, but I'm not assuming everybody knows it.
Standard size sander blocks are sized to
the sandpaper. You can measure the paper with the block as in the
picture or you can fold the paper in half tear it off and fold those
pieces in half again and separate them. In any case one sheet of paper
will make four useful pieces. Wet or Dry paper is really tough so you'll
mess up now and then. The preferred method is to fold the paper with the
abrasive side out, pinch it together as tight as you can then tear it
using a sharp edge as shown here. I use the pieces on the block, (of
course), folded in third for hand sanding, and cut a paint stick to the
width of a sander block and wrap the paper tightly around it. The stick
is a super handy combination of block and hand sanding for small areas
or large. It's not quite as accurate as a block sanding on flat areas,
but I find it makes wet sanding a lot easier on your hand. I always
follow up either method with hand sanding, dry the part, then run over
it with a Scotchbrite pad. The Scotchbrite just gets the entire surface
uniform while removing a minimum of material.
|
Keep an eye on your fingers when hand sanding, you may want to start off wearing a latex or nitril glove to save wear and tear on yourself. I once wore the skin on my fingers so thin I started bleeding right through it before I knew what was happening, put a latex glove on and kept going.
Remember to spot prime any areas where you happen to sand through to metal, let it dry, and Scotchbrite it.
The
next step is to wash everything with plain water and powerful stream from a hose
nozzle or pressure washer. This gets rid of all sanding dust, abrasives that
have worn off the sandpaper, and bugs; especially spiders. Those little devils
will take up residence in the tiniest places, so wash them out good, the
hardiest ones will run out onto your paint when you start spraying. I like to
wash everything the afternoon before I intend to paint, stand it up against
something and let it dry overnight. The next morning I'll turn the doors, hood,
etc 90 degrees just in case some water stayed in there somewhere and let
them set while I do my masking and prepare to paint.
______________________
| |
Here's a neat trick: Mask the door from
the inside while you're outside. It's the only way to get it
right. Start at the straightest side and keep working it until you have
an arm, then hand, then finger hole at the bottom.
|
______________________
| A minor point, but usually forgotten. Screw the attaching bolts in wherever they belong before jamming and when you're done they're painted too. If washers are involved set them about like on the lower yellow bolt and they'll get painted on both sides just as a matter of course. What little paint gets on exposed threads is of no matter. |
======================
![]() - Lesson 3-
- Lesson 3- ![]()
Painting Jamb Areas
Now, its on to painting the jambs. You can spend all the money you want on tools to paint with, but this is all you need.
|
1. A
compressor that can produce at least 8 cubic feet a minute flow at 40
PSI with a 20 gallon tank. Horsepower and compressor type don't matter,
the above specs do. This little compressor won't keep up with any air
sander, but it will a paint gun or any pneumatic powered wrench in a
home tool box.
2. The paint gun is a cheap copy of a Binks # 7; it and a like-model DeVilbis were the standard paint guns for over 30 years. Sure they produce more overspray than a new HVLP gun, but what do you want to save; a hundred bucks on a paint gun or 2 ounces of paint per gallon? You can shoot any type of primer or paint with this old style gun by making minor adjustments instead of changing the spray head. 3. The orange bulb at the air inlet is an air filter/moisture trap and they work like a charm. 4. The mask is a common 3M type, costs about $20.00 and new filters are cheap at most auto parts stores. 5. The air hose is a light painter's model. You don't need a heavy hose that can hold 350psi for a compressor that produces no more than 120psi. A light hose while painting is a definite advantage. |
______________________
|
And, here, boys and girls, is a painted
door jamb. Note the overspray: it was intentional. The object is to
paint the jamb and coat the entire edge of it. The overspray will sand
off easily, and we'll go on from there. The sanding technique will be
explained later.
|
______________________
| BEFORE PAINT: AFTER PAINT: |
Notice here the "loose" masking
around the engine bay. That was to make sure the edges got painted, and
I learned something here. I should have sanded the primer and masked on
back another inch from where I did. This paint has terrific build and I
came up with a masked edge about as thick as 5 sheets of paper. If I had
moved back another inch it would have made feathering the overspray into
the primer much easier. I knocked the edges down with 120 dry paper
wrapped on a stick; more sanding later.
|
______________________
| You get really up close and personal with your painting in an area like this. I was in that hole not once, but three times blowing paint in crannies and behind areas you can't even see in the photos. That air intake box across the firewall was especially tight and was blow and go all the way. I was amazed at how forgiving the clear coat was and how it flowed out slick everywhere. In spite of crawling under and up into the engine bay 3 times, shooting up, down, sideways, and all around I never once got into the paint. MGBs are much easier, just walk around outside, you could even tap dance while doing one of them. |
______________________
Jambing is finished; and, it all turned out quite well.
| Note the bolts in the hood. There is only one run, in the clear coat, that needs to be fixed and it's in an easy place to work that is normally hidden. Carefully finger and block sand off the run finishing up with 1500 grit paper and compound buff that spot. Only 4 tiny bugs are immortalized in the paint. Two in an obscure area in the hood where they will remain entombed and two on the inside of the left door. The two on the door can be easily removed, the clear coat touched up with an artist brush, 1500 sanded, and finger buffed with polishing compound. |
We're coming down to the wire now and one unattended flaw, anything unnoticed is going to stick out like a sore thumb in the finish coat.
 |
The worst of the overspray has been removed with 120 dry paper wrapped tightly on a small block of wood, and we're ready to start some finish sanding. The mess all over the side of the truck is the guide coat I told you about earlier, don't you dare skip this step. Notice the yellow hard plastic sanding block, little sanding stick, Scotchbrite, and loose sandpaper on the edge of the truck bed; I decided to knock everything down quick so the sandpaper is 240 grit wet paper which is actually too course but works fast to find what I'm looking for. More about that in the next photo. |
You've probably noticed by now that I'm a big fan of stick and block sanding. Block sanding is an absolute must at this stage. If you have a rubber sanding block throw it on the floor as hard as you can, see how far it bounces, and don't retrieve it. It'll pick out some flaws, but a hard plastic or wood block will find all of them. A hard block, in conjunction with a guide coat, will pick out every low spot, high spot, sandpaper scratch, pin hole, or paint run no matter how small it is. Rubber sanding blocks cost me 4 times more work than actually needed doing until I learned what works best.
On anything except a high spot or pin hole try and see if it will block sand out. If you get into the bottom coat of paint, or metal, and the flaw remains you'll have to skim in some filler or spot putty. Spot putty is actually thick lacquer in a tube, like a toothpaste tube, and is used only for pin holes, sand scratches, and very shallow voids; otherwise use a finishing filler like the Putty-Cote mentioned before. 3M spot putty comes in a monster tube you couldn't use in a lifetime so find some Bondo brand in a smaller tube for about 1/4 the price; same stuff, thick lacquer.
______________________
I
once had a guy tell me, "I never block sand the final primer, I just palm
sand it. What's wrong with that?" Actually nothing is wrong with that if
you want your finish coat to look like a mirror...in a damned fun house. Block sand it!! Period.
Block sanding with a guide coat will
find low spots no thicker than a piece of paper, palm sanding will only deepen
it and cause a wave in the finish coat. When you hit a high spot you'll go
through to the metal in nothing flat and you have to stop and look things over.
Is it a sharp rise or a shallow one? Will primer and palm sanding fix it?
 |
In this shot, what I wanted to find out
fast was if the flat surfaces were as flat as I thought they were; and
they were, almost. There were a couple of low spots that sanded right
out, and some that feathered out good and wide. The low spots
worked out with the block and the dark gray primer is covering the high
ones. The dark spots of primer are OK with the color of paint I'm using.
If a light color of paint was going on, I'd match the primer color or
re-coat the entire primed surface with a light colored primer/sealer.
Damn, in too deep again. Now we've gotten into "color hold-out". Let's catch that at the bottom of the page. Anyway, The tiny red spot on the back edge of the cap is spot putty over a pin hole, there were only 2 in the entire side of the truck. Another thing I wanted to find out quick was where the water is along the side of the bed. Was there actually a single break along there or a double one? I was nearly praying single, but you can't actually tell something like that until the final block sanding. (Single or double has to do with a modification I made to the side of the truck, you'll not have to contend with anything like that.) The water is there because I wetted the area, got down at a low angle, and checked it out. Remember that from before? You look at your work, and you look at it, and you look at it until you're sick of looking at it; and, you look at it some more. Still you won't find a couple of flaws until your finish coat is on. But you know what? You're probably the only person who'll ever see them. They'll bug the crap out of you, but just keep your mouth shut and chances are nobody else will ever see them. |
Back to the knock down with the 240 wet paper. Like I said, 240 is too course for finish work. There's a good chance it will leave some sand scratch that will show in the finish coat so lets eliminate that possibility. Normally I'd have done this step with 400 wet sanding so the next step is to wet palm sand everything with 400. It's OK this time because I know it's flat before I start. Next is to dry it off and pet the whole thing with a 3M # 7447 Scotchbrite pad and we're done
Even with that, professional painters have to "shoot a color card" which is six or eight different shaded strips on a special paper card, match a stripe to the car, mix the paint, shoot a sample, and check that before doing a panel repair on most any modern car. Occassionally, the paint on some cars can't be matched even when you have the VIN and alternate color paint code. Many cars have up to 6 alternates of one color number; and, sometimes the codes just don't jibe with the car.
So, if you want a panel repair to actually match on your late model car take it only to a body shop that has a paint mixing station. Only the best ones do and their "shooters" are the ones who make the big bucks, because they deserve it.
======================
![]() - Lesson 4-
- Lesson 4- ![]()
Final Finish
 |
On the passenger side, the area from
the door jamb back to the fuel filler had taken a hit sometime
and had a botched repair. I had to remove all the old filler from that
area, build part of the jam farward about 3/8" with
fiberglass reinforced filler, and re-do the whole job. I worked the
area 'till I couldn't stand to look at it any more and was sure it was
flat, but it wasn't.
The guide coat and block revealed three low spots and a pin hole. By the way: When you spot a pin hole, drop everything right then and mark it with a pencil, they're just too easy of forget because they are so small. None of the low places were any larger than a quarter and all very shallow, so spot putty fixed them OK. They were about the thickness of a business card when I began hitting first on primer and metal around them. When you happen onto a flaw don't fret about it, just fix it. You know how now. Spot putty takes a while to dry so skim it in and go on to something else for a while. You can see that I was working the side in sections. I skimmed in the putty, moved on to other things for a couple of hours, came back and finished this. Same deal with spot priming. If you wait on that one thing you'll try to work it too soon and screw it up big time, it never fails.
I'd forgotten to jamb that fuel filler
access when I did the other stuff, but instead of mixing a batch of
paint for the big gun I did it with my little air brush and a little
over an ounce of materials. I used it, also, to repair the bug spots
on the left door, all it took was a little clear coat.
|
Funny thing about bugs in paint: They usually die quick and when you sand them off there's not enough of them left to see. The worst remnants I've ever seen was a small line about the size of 1/16" of an eyelash. I did have one hardy little bastard I stood and cussed for 5 minutes while he bulldozed a gnarly one inch 'J' in my new white fender.
______________________
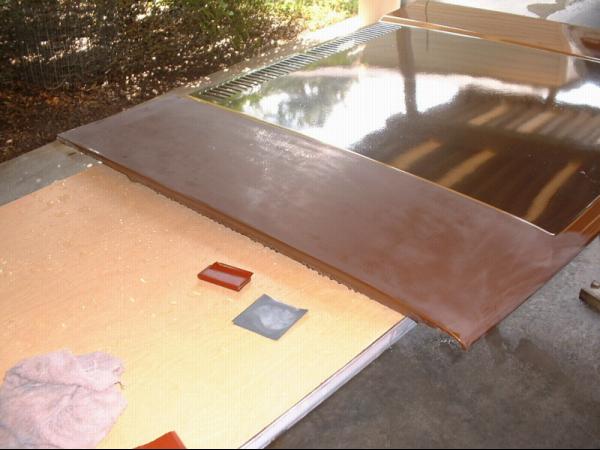
400-Grit (Wet)
|
In these pictures you can see what
I meant by 'getting a more uniform surface with a dry Scotchbrite pad'.
The top photo is after wet sanding with 400-grit paper, and the bottom
after Scotchbrite. This is nit-picky and not by any means prerequisite,
but sometimes you'll find a tiny flaw that would otherwise be missed.
While Scotchbriting a door, a curtain (run) in an underlying layer of
primer jumped out at me like a starving
dog after a blowing burger wrapper. It
got by me twice, but the Scotchbrite sanding step caught it.
|
______________________
You have entered...........The Compulsion Zone.
A tiny flaw gets a quick skim of spot putty or a shot of primer and you wait, but time drags on so you go onto something else. Time for a test and you push a fingernail into the edge of the putty. Not ready. You smell the primer and the heady fumes are still strong. Still not ready. You run your hand over the surface and feel the smooth perfection of it, bend down and spy across the finish moving this way and that to play the light over it from different directions. Soon the primer or putty is ready to work, but a little differently this time.
We're to the point that wet sanding with 400 paper seems heavy handed so we grab a worn out piece of dry 400 off the floor and fold it into thirds, worn side out. Then the stroking, petting, and hoping that this is the last time around for this last piece of a job that you have become part of, and that has absorbed every portion of your soul.
 |
That's It! It's finished to the perfection you've worked and wished for over a period of weeks, and you stand back and gaze in awe as all the problems you had with this job seem to vaporize and rise into the air like a bad spirit returning to it's rightful abode. |
______________________
At this stage you stand back, admire your work, and feel you're finished prepping; not quite.
| You would do well at this point to take a damp cloth and wipe it over the entire surface. The water should spread over every square inch evenly with a damp sheen, and there should be no drag on the rag anywhere. Any drag means, "Stop right here and have a look". When you do, you'll see an area that looks almost dry. That's where solvents have risen to the top of a primered area that wasn't sanded properly or you missed altogether. That spells big trouble in the finish coat as "fish eye" or multiple blotches in the color coat that can't be painted out. The flaw will lessen only a little and become deeper with each successive coat and no amount of painting will eliminate it completely. |
When you find one of these places, use a piece of dry, worn 400 paper and hand sand over it with an ever-so light touch. The paper will have a light drag to it's feel at the start and when you no longer feel that you run the damp cloth over it again. Repeat this, if necessary, until that surface matches the rest. Lightly stroke the area with the Scotchbrite, blow or wipe off the dust, and you are finished.
Oh, I advise not using Plasti-Kote # 391 anti rust primer. It's good stuff, with a lot of solids, but dries rather slow and clogs sandpaper quickly. The Krylon Rust Tough works well, but is rather dark. Both companies market a variety of primers of different colors and compositions. Rustoleum makes excellent paints, but they are not compatible with a lot of other brands/types until they have dried and cured out completely which takes a couple of days. Primers and paints of all kinds retain some of their solvents for a very long time and we'll have more about this near the end of the article.
______________________
Don't be tempted to use tape sold by building supply companies nor cheap tape to mask a line in automotive painting. The adhesives in those tapes may not hold an edge against the solvents in automotive paints and bleed by creating a gagged line. Or the adhesives could be converted into a slimy mess or hardened to the point the tape is difficult to remove. Cheap tape is OK for sticking down loose edges of masking paper and such as that, but not for working directly on the finish area.
The cheap stuff is used only to stick down loose edges of masking paper, the 3M tapes are used wherever you're making a line on the painted surface. It's OK to use cheap tape on a masking roll rig when covering outward from areas where you have already masked your line.
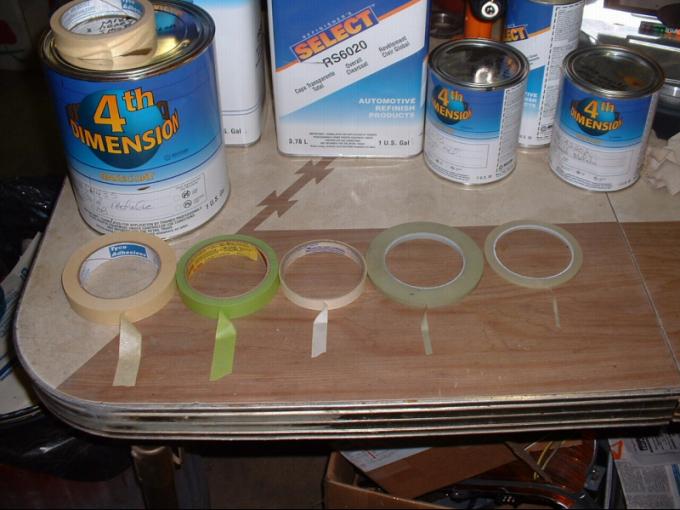 |
Masking tape comes in widths from 1/8" up to 2" with the most popular and universal being 3/4". In the picture you see a roll of 3/4" cheap Tyco brand, a roll of 3/4" green 3M, a roll of 1/2" cheap stuff, some 1/4" 3m Fine Line, and a roll of 1/8" 3M Fine Line tape. |
When masking a sweeping curve, like the lower panel on the side of an Austin Healey 100, keep about a 1' span of tape between the point that is stuck down and the roll. Get the tape to the line by moving the roll and stroke it down as you go. It takes good eye/hand coordination, but if you've got that it keeps getting easier all the way.
Then I sharpened a pencil, not so much to make it sharp, but to expose a lot of lead. Using the side of the lead, I stroked the edges of the letters to create a line to follow, and cut the letters out with a razor blade. The rest of the gold was then masked, the dark color shot, everything unmasked, and the results are in the photo. The top curves of the gold on the tailgate and the gold in those tight curves near the backs of the doors, on the cab, were done much like the letters were.
|
These are the essentials of masking.
The paper roll rig isn't, I've never used one before, but I've got a
lot of big time masking to do so I borrowed the rig and bought the
materials. Newspaper does a good job if you double it and it works
easier that way. Always start off by taping on the folded edge and
you'll save yourself a lot of trouble. Masking is an acquired skill
and you will develop your own techniques as you go.
|
When painting a car some paint will always blow into the cracks around the doors, so we must get ready for it by masking anywhere we don't want paint to go to go. Most of what blows into the cracks will be rather thin, but that doesn't matter because the area already has a good coat of paint. What we want to avoid is a garish line anywhere in the door jams or edges and having overspray all over the inside of the door.
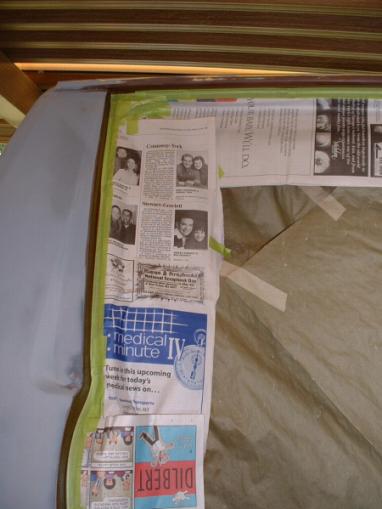 |
The ideal masking area on this vehicle
was dead center of a 90° inside bend that goes nearly all the way
around the jam. A line is less noticeable in a tight inside bend like
that than any other visible area. Doors are usually pretty easy to find
a good dividing line on. You can mask along the weather-strip area where
it's close to the edge or up against the edge of the door skin
where it folds against the door. I had to use a combination of the two
on this door.
|
Tape
your paper along the outermost point you are covering in the jam first, then
press form it to the shape of the jam and tag the edges of the paper with a few
pieces of tape. Forming the paper to the jam is important because if you tape it
tight over the jam it will tear right in the jam area when you close the door.
Keep it pulled in tight around the corners and edges of the door so it doesn't
push into the unmasked areas when you close it.
______________________
When masking in tight areas, you just have to do the best you can. Stick one end of the paper down near the line you want, then stick the other end down, or you may have to work around a curve on the way. Working with a roll of tape in close areas is usually impractical so use as many short pieces as you have to in order to get the job done. You'll soon learn how to avoid making a crooked or jagged edge. It's not always possible to look straight down on the top of the tape while working a close line, but it's much easier to do when you can.
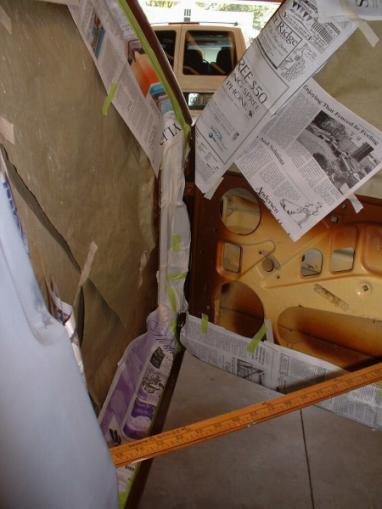 |
In this photo, we've worked into a
tight cluttered corner with door hinges, a door stop fitting, and
compound curves. There's just no room to work paper so we switch to
2" tape and keep sticking it on until everything is covered. Ahead
of that tape is an even worse area that is covered in the next photo.
|
 |
You can see that inside that crack is a
painted void that is impossible to reach with the door on, in fact it's
nearly impossible to see. Granted, nobody will ever see this area, but
we're being picky here and we're going to keep most of the overspray
from spreading in there. What I did was to take some half-sheets of
newspaper, loosely wad them, and cram them into the void through
the larger crack inside the door. This is something you may never have,
or want for that matter, to do, but you know how to do it. Before I
start painting I'll reach in the crack of the closed door with a hook
wire and pull the paper up close to the edge.
|
I besieged a masking Guru and he sayeth unto me, "Anywhere you don't want overspray to go has to be masked up good and tight.", so I doneth it from that day forward and life has been good.
| The last steps in jamb masking it to skuff the exposed painted edges with Scothbrite. It doesn't need to be deeply sanded, only skuffed enough so the paint that blows into the cracks will stick to the surfaces we intend for it to get on. Follow up each section you skuff with a clean rag and wipe away the dust. |
OK, its all over but the shouting, er, shooting.
| The jam masking of that door was holding it slightly open so I leaned that an old school cafeteria table propped against it caused the paper to 'take a set' with it closed. |
First blow compressed air into all the cracks and sweep the entire prepared area with it. I'll go over the whole thing with a rag dampened with water and look for fly specks or any other water soluble contamination.
Next comes the Prep-Sol, which is a preparatory solvent made by DuPont. There are several of these solvents under different names from different companies used to remove any oil based contaminates just before painting. The main culprits are: Skin oils from touching your skin or hair and then touching the primed surface, excess oil from aerosol primer from possibly forgetting to shake it up good before beginning to spray, and mysterious crap that just got there somehow.
You soak a clean rag with the solvent, and wipe an area with a good wet; not quite a running coat. Let it set a few seconds and wipe it dry, or nearly so, with another clean dry rag. The Prep-Sol will bring any excess oils to the surface and the dry wipe removes them. The solvent should lie in a uniform flat wet coat and if you see any unusual separating or "funny" pattern you have found a heavily contaminated area. Keep wetting and drying that spot until the solvent lies as it should. Give the solvent a few minutes to dry out completely before spraying any paint.
======================
![]() - Lesson 5-
- Lesson 5- ![]()
Painting
|
Then I use a center punch or nail and hammer to punch little dings in the side of the can on the top two marks so I can see the exact measurements and ratios inside the can while mixing. |
You can also mark a paint stick and have it standing in the container as your scale while you are mixing. If you want to mix less use a smaller can or substitute 1/4" or 1/2" for 1" per part as you measure the container. Sometimes you'll run across what looks like a screwy ratio in the instructions because they never use a fraction of a unit in the measuring process. For instance: Your paint requires reducer and hardener in the mix. The ratios given may be something like 6 parts paint, 2 parts reducer, 1 part hardener to 6 parts unreduced paint. They will never have anything like 3 parts paint, 1 part reducer, 1/2 part hardener to 3 parts unreduced paint.
Now for that portion that says "1 part hardener to 6 parts unreduced paint". The way we are measuring it just means "1 part hardener", forget the "to 6 parts unreduced paint", our mix will come out right because of the method of mixing we are using. The can with 4 marks is marked incorrectly for what I'm doing and I discarded it, but you've got the idea about easy measuring.
______________________
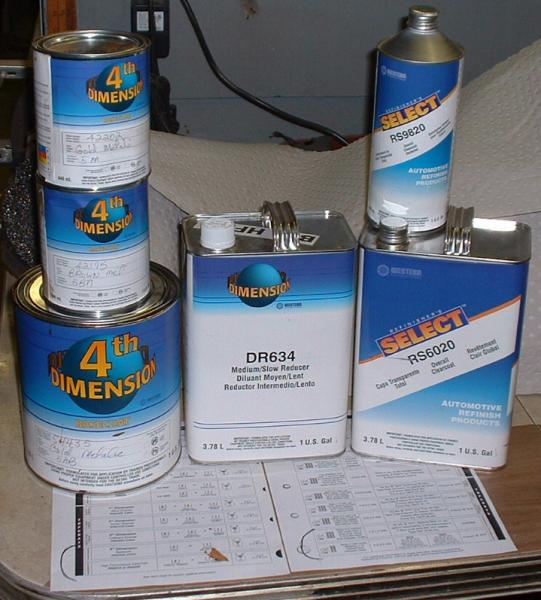
The basecoat in this Sherwin Williams 4th Dimension system requires no hardener which is a big advantage. That being you have up to 7 days to apply the clear coat without first scuffing the base to make it stick. I didn't need that window, but had the temperature dropped or the humidity gotten too high for a period of days after the basecoat was on I may have.
This is one of the "economy" paint systems, how economical depends on the colors you choose. It is quite easy to use, the instructions are simple, the times between each step of the job are reasonable, it lays out good, and works very well in the environment I was working in. There are other so called "low priced" paint systems, DuPont's Nason series being but one of them.
Body shops sell time, that is their bread and butter, the mark-up on materials is minimal by comparison. The big shops that have a mixing station and professionally designed and built paint booth have specialists in every area of body repair. The "mechanics" get the car first. They do the necessary frame tweaks, panel replacements, and repairs.
Next a painter who may or may not be the finish shooter applies the primer, and sends it out to the prep boys. They sand the primer, where and if it needs it, and mask the vehicle in readiness for the finish coat(s). Some of the primers they use require no additional work before applying the finish coat. These guys are fast and efficient and do little masking with tape and paper like we have to.
Door jambs are "masked" with an expensive round sponge tape that blocks air flow and doesn't create a line where it's used. Most of the body masking is done with a very thin plastic sheet that holds to the body by static cling and is taped along the line to be painted.
Then, it goes into the paint booth and the main "shooter" who earns and average of $1,200.00 per week, so the company wants him turning out as many jobs as possible and thus the working speed and expense of the paint systems they use. When he's finished it goes back to the prep boys for final detailing of the finish, then to the body mechanics for installation of glass, trim, interior, just whatever that job requires to be finished.
______________________
There are several factors that can contribute to making a finish coat a dismal failure. Up to this point you've learned how to avoid all of them other than blowing dust and bugs. Bugs will be there or they won't, its just the luck of the draw, but you know how to deal with them. If you noticed the floor in the pictures taken after sanding was finished, you've seen it is washed as clean as it can be made; this helps the dust situation.
Here's the scenario: You prime an area and have ants in your pants until you can finish sand it. The paint gun is standing by with the mixture in a can ready to stir, dump in and shoot. You knock out the job in record time and it looks great, the best you've ever done, and it looks great...for a few days, weeks, or even months. Then, one day, you're washing your car and you feel something strange underhand. You dry it off, look, and see nothing wrong.
Wait a minute, what was that? You get down at a low angle, move around to shift the light and "What's that?" It's Solvent Pop: thousands of tiny pinpoint bubbles in your paint job. How did they get there? In your rush to get the color coat on you didn't let the solvents escape from the primer.
In other words, you didn't let it cure. Those solvents were trapped by the paint, weeped out under it, and the first time the car sat out in the hot sun, the solvents changed to gas, expanded, and blew bubbles under the paint. It could be worse. It could actually lift big sections of paint in which case it would soon peel off.
______________________
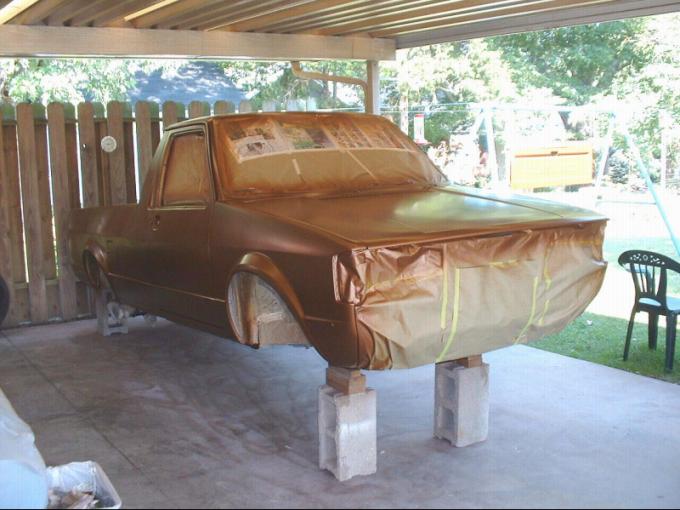
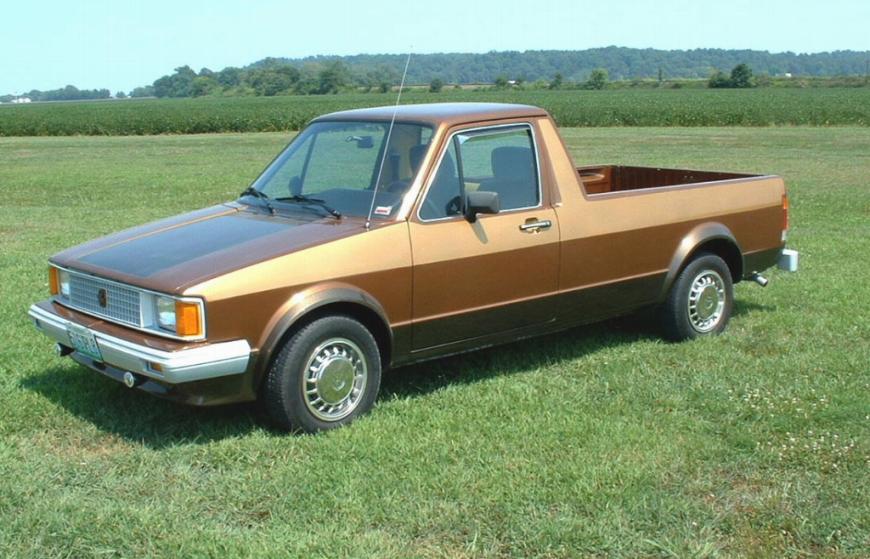
| It was a quiet celebration, Miller time was. As I relaxed at last there in the shade with a cold Miller High Life in my hand, my gaze was fixed upon, of all things, a 1981 Volkswagen Rabbit Diesel Pickup tailgate hanging in the sun where my yard swing should be. My eyes played over the glittering copper and gold glinting in the sun like an Aztec idol with millions of tiny copper flakes winking and glittering from the dark, nearly black, pewter accent panel with the near perfect hand cut letters |
Countless days of toil and drudgery faded into nothingness as the final coat of paint dried, shrunk, and cured, becoming smoother with very minute. Another Miller and another smoke. I hadn't relaxed like this in days. Why?
Because today was the culmination of a labor of love which has been especially stressful. The success of my labors depending entirely on a discipline for which I had to constantly remind myself, "It doesn't have to be slick, just wet, it'll lay out later". I must have repeated that phrase to myself a thousand times doing this final round of painting today.
But, today, there she was.
| No drips, no runs, no errors. Three shallow curtains in the clear coat with the largest being 1-3/4" long and 3/4" high and simple to repair. All lines between the colors are as if cut with a knife, and no discernible division can be felt between one color and another. There is no dividing line between jamming the doors and painting the truck. |
1) The paint doesn't have to go on slick, just wet looking; it will 'lay out' (the surface will blend to a finish) later as it cures.
2) Just because a paint gun's instructions say it will hold a full quart doesn't mean you have to put a full quart in it. Fill it to within about 2" of the top so none can get out the cup vent and drip onto your finish coat. After a shot sharply upward or downward check the paint cup for runs down the side. If you see any it means your cup gasket is not sealing properly. Unless paint is simply running out, grab a rag and keep shooting, and start wiping the run off making sure not enough accumulates to drip onto your work. The next time you fill the gun, check the fit of the lid on a top cup gun or if you are using a bottom cup with a clamp type closure just turn the cup around 180 degrees and that may fix the problem.
3) When removing masking tape always wait well past the flash time, maybe 4 times longer, and try to pull the tape back over itself at a 45 degree or lower angle. That will cause the paint bridging from it to the finish to be cut instead of trying to lift.
She'll be a 1981 VW diesel pickup with the turbo-diesel engine and 5-speed tranny along with the dashboard and most of the interior and some exterior parts from an 1984 VW Jetta. There is also a little bit of VW GTI and Dodge Neon thrown into the mix also. She will be quite unique, nothing like her ever before, and never again.
Thanks to Pete Cummins she already has a name. Pete christened her the "JETTUP": a Volkswagen pickup built with the heart of a Volkswagen Jetta.
______________________
  |
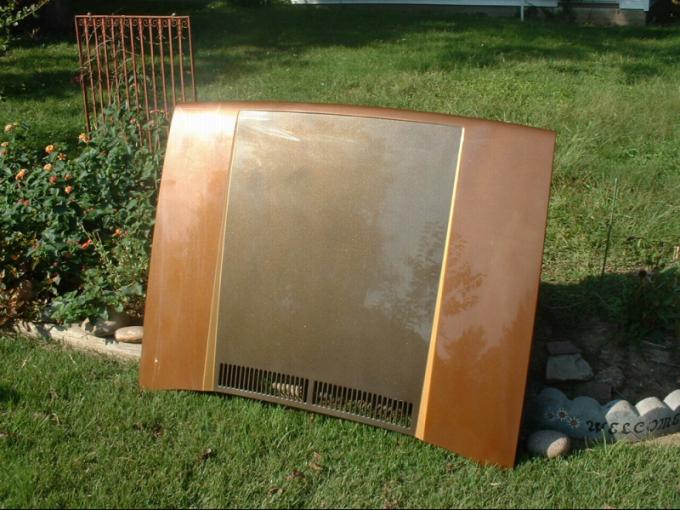
Remember what I just said about orange peel and following instructions? Well, here is a fine example of orange peel caused by not following instructions. The instructions for the clear coat said to apply 2 coats. When I got 2 coats on everything I had about 1/2 cup of paint left and didn't want to waste it so, I gave the hood and outer tailgate a third coat. |
When I jambed the hood with 2 coats of clear it was horizontal and came out slick as a button. While painting the tailgate I put 2 coats on the inside, 3 on the outside. The outside orange peeled, and the inside is "slicker than greased owl manure". The entire rest of the truck got only two coats of clear and is much smoother than either of these items; in fact I'm not going to sand or buff the dark color along the bottom, it doesn't need it at all.
Big Mistake!
That 600 put sand scratch in so deep neither 1500 nor buffing could fix that mess. You absolutely can not remove sand scratch with a buffer and finishing compound; it will only widen and deepen the scratch. I had to trash the rags I'd been using because they had 600 grit abrasive in them from wiping the hood down, wash the hood to make sure it was off of it, and spur the buffing pad to rid it of the "gravel" it had accumulated. Next I stick sanded with 1200 wet paper followed with 1500 hand sanding and buffed it again. Some 600 scratch was still there. Back on it with the 1500 followed by the buffer again and that got it passable.
Always buff at low speed, if you're on high speed and stay on one spot too long or make the wrong move things start happening real fast and you can ruin a job in the blink of an eye. Keep the buffer moving. We are removing paint with wet pumice and a fast moving pad. and the friction causes heat. Stay still too long and the heat will soften the paint, the pad will get hold of it and pull a chunk out; it's called "burning" the paint. Get on an edge wrong, the machine jerks in your hands and you have burned completely through the paint and into the primer before you know anything went wrong. So run the buffer on the low speed and give yourself that extra split second advantage.
1) wear old "trashed out" clothing. sometimes what that buffer slings on them simply won't wash out, ever.
2) shake up the compound and squirt some on the surface to be buffed, you'll catch on to how much pretty quick.
3) set the buff pad in the compound and smear it around a little, then start blipping the buffer switch and spreading the compound around the general area where you want it.
4) switch the buffer on low speed and start buffing somewhere away from any edges of the part you are working until you get the feel of the machine.
Don't force the buffer into the work, it's own weight is all the pressure it needs or should have. Notice that when you hold the main handle up the front of the pad tries to pull it to your left, handle down and the heel pulls it right; secondary handle down and the buffer pushes toward you, up and it pulls away. Make careful note of the relationship of handle movement to buffer reaction and what part of the pad is doing the work.
Now for the important part: When you approach an edge that is the "cut off" edge on your right hold the main handle up slightly, keep the right edge of the pad barely over and perpendicular to that edge with the toe edge of the pad spinning off the cut off edge. Never buff onto any edge, always buff off it. If that edge is sticking up like the fender bead on an MGB you'd use the same action except you'd keep the pad off that edge as much as possible. Letting the pad run across any sharp edge will buff all the paint off it in a twinkling. After some practice you'll be able to buff a complete tailgate, small trunk lid, or anything you can reach across without walking all around it. Just practice on a flat area using imaginary lines until you get the gist of it. Your buff pad should be at least very slightly damp, except for one instance explained later.
The dried pumice and fur will fly so do it where you can make a big mess and it doesn't matter. In fact this is the best way to clean a wool buffing pad either when finished or before use. Washing them causes the wool to knot up on the ends and you have to spur them before use anyway. Don't worry about hurting the pad, I've used and spurred the same one for 15 years and It's still going strong, You should spur the pad any time the buffer sits idle for more than a couple of minutes.
My pad was dry, but uniform and didn't need to be spurred when I used it on the tailgate for the last time and it seemed to remove the swirl so I tried it on the hood and it looked like worked there too. Maybe it did, I'll find out later. Something else that will hide swirl and eliminate surface haze is 3M # 05977 pink Fill 'n Glaze. This stuff has no wax, silicone, Teflon, or any "wonder drugs", is hand applied and buffed, works very easily, and very well. After buffing my tailgate had a surface haze in an area where in diffused light the color was subdued. I wiped on, wiped off some pink Fill 'n Glaze on about a three inch circle and it looked like it just lit up. It works well on any car finish.
 |
I got good light on the hood and tailgate
today and there is no swirl. It also dawned on me what is causing the
nearly imperceptible haze on the surface. It is buffing compound stuck
in the paint from working it so soon after applying it, about 24 hours
after. That's not a problem, left alone it will slowly be removed by
successive washings, it can be re-buffed when the paint cures more, pink
Fill 'n Glaze will fix it, maybe even a wax job will mask this
minor situation. The reason I started color sanding and buffing so soon
is if you let clear coat cure too long it gets so hard you can hardly
sand it at all.
|
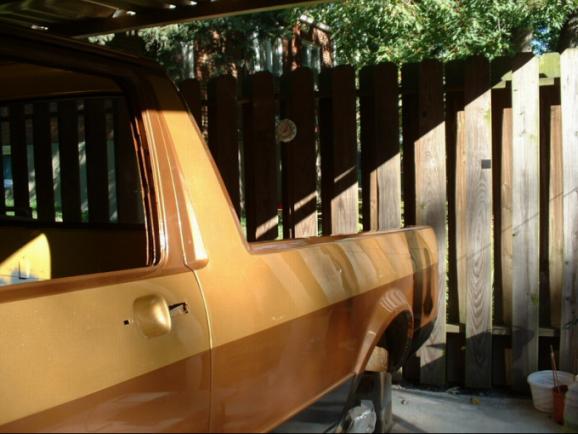 |
It's totally amazing how much these
colors can change under varying lighting conditions. In this picture
the side of the truck looks rather mundane and the dark at the bottom
appears nearly black. In bright sunlight the colors show true and light
up as they should. If you scroll back up to the tailgate and compare it
with the hood you'll notice some subtle differences there too. Both
pictures were taken in bright sunlight, but the tailgate hadn't been
color sanded and buffed at that point, the paint was still nearly wet,
and the orange peel mentioned earlier hadn't developed.
|
______________________
First: You want to end up with accents, not distractions or a "hillbilly" motif.
Second: The pin striping should create a tie-in with the interior of the vehicle.
Third, and very important in this case: The tape must have the flexibility to conform with curves in the paint design. There are a dozen curves with the radius of a quarter in this job so the tape will have to be narrow, and I am currently researching tri-color designs only 1/8" wide.
We'll get into pin striping later as Fall is coming on and I want an ambient temperature of at least 80F to lend flexibility to the tape before applying it.
======================
![]() - Lesson 6-
- Lesson 6- ![]()
Undercoating
(actually, just a vignette, but important)
The first time I used this was on my new 1962 Studebaker Hawk, which is sitting on my carport, and none of it has ever cracked, chipped off, or failed in any way. Aerosol undercoats are fine and there are a lot of excellent ones on the market. However, even at the thinnest you can smear roof sealing compound on, you'll have three times the protection you can get with an aerosol product. It is unsurpassed in rock chip protection, sound deadening, and corrosion defense. When fully cured in 4 to 6 months, it can be painted.
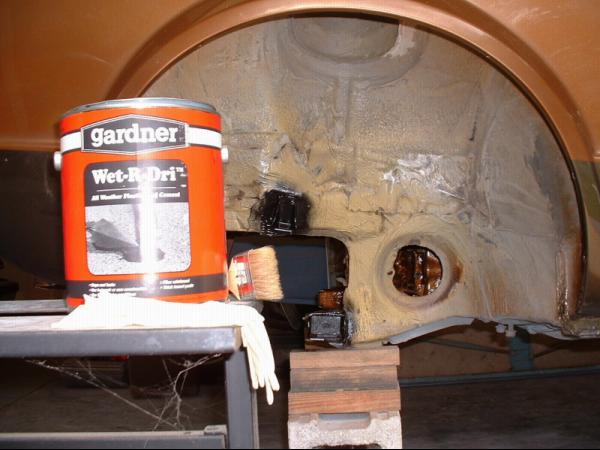 |
As you can see this fender well is very rough. This is a result of the factory "gomming" on rubberized body sealing compound with a course brush. Some areas were so rough I used a body grinder to remove some of the compound and smooth things up a bit. Some thinner areas had dried out and were getting loose so I removed what had failed and sealed the fender wells with Penetrol. Penetrol is an additive and primer for oil based house paints that I have found to be an excellent rust proofing for cars. |
 |
I finished up this job by checking it out with a flashlight and spraying missed spots in tight places with aerosol undercoat to insure a positive seal everywhere. The last step was to dip the tip of the brush in mineral spirits paint thinner and lightly stroke the visible surfaces to smooth them out. |
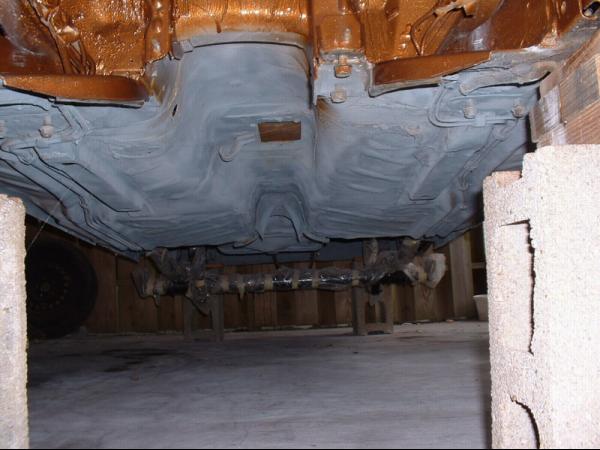 |
The fender wells weren't the only thing
that got undercoated. The first thing I did after stripping everything
off the truck was to scrub and pressure wash the entire bottom. This
was followed by some minor corrosion repairs, sealing with Penetrol,
and applying a coat of truck bed liner.
|
Overkill? Maybe. I'm just pickey that way. But, here's the finished product; you decide.
John
Dandy
(theAutoist
NOTE: John Weimer's new "nom de plume")