Converting
to 2-Speed Wipers After
seeing discussions on several internet BBS's about upgrading older MGBs with single speed windshield
wipers to the later two speed ones, I decided to tackle this project. I had
previously been made aware of instructions on how to do this, but after
checking them out could see that the wipers wouldn't park when the switch they
used was turned off. So, I did quite a bit of research, circuit testing, wire
tracing, and consulting and have came up with an instruction package for you.
![]() As
of: 6 December 2002
As
of: 6 December 2002 ![]()
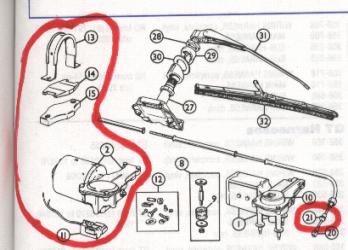
The first thing
you'll need is a 2-speed wiper motor and attachments that can be
obtained from anyone who salvages MGB's. Tony Barnhill, of this site has
several, and the picture shows what you'll need. The wiper motor (2) and
park switch (11) will be assembled when buying a used motor. You'll also
need the mounting strap (13), rubber pad (14), and spacer block (15),
along with the ferrule (21). Get the mounting bolts too if they'll send
them.
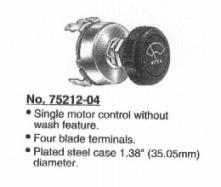 |
The second thing you'll need is an in-dash wiper switch that will park the wipers properly when they are turned off. It took a few days of research, but I found one (and only one) in-dash switch that will do the job. It's a Cole Hersee #75212-04. The knob on this switch is about 1" in diameter and will blend in well with it's surroundings, especially if you mount it where the old wiper switch is now. |
Cole Hersee is the industry leader in big truck switches and other electrical items, and their products are available only from heavy truck dealers and parts suppliers; they do not sell direct to consumers. Check your yellow pages for heavy truck dealers and parts suppliers. A source for a similar switch, but it has a "push the button to wash" feature, is Jeg's High Performance Parts. See the actual switch at this link:
So I made an arrangement with British Wiring http://www.britishwiring.com phone 708-481-9050 to make up a harness for this job. Contact them, ( I dealt with Ed) and ask for "Small Wiring Harness #423". They said it costs $23.00, that's a lot less than you can make one that's not proper in the end. This #423 harness has the plug for the wiper motor and 4' of the proper color coded wires with shielded female spade connectors for attaching to the switch. There is also a short black ground wire with an eyelet on it.
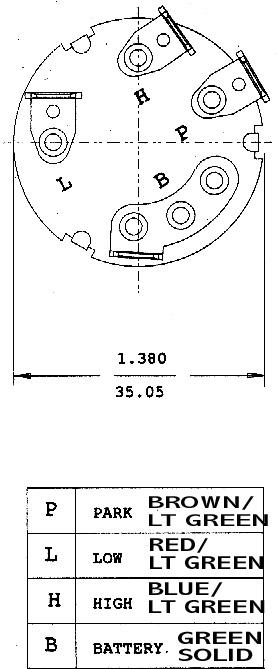 |
This illustration of the back of the switch shows how the wires of the harness are connected to it, and there are only two other connections to be made. The eyelet on the black ground wire goes under any handy screw on or near the motor that is grounded. You will find a solid green wire to your old motor plug and it gets tied in (attached to) the solid green wire in the new harness. |
NOTE: On some models the solid green wire may be a green/pink one. That's OK, they both do the same thing and changes nothing about the operation of the wipers.
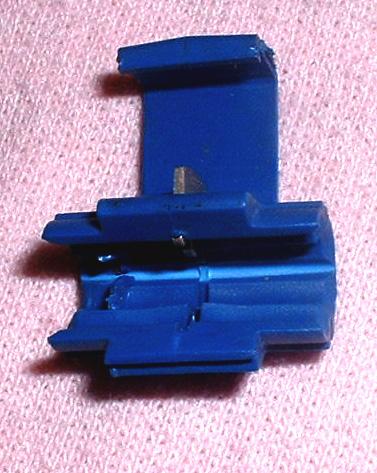 |
Just connect it near the motor with a quick splice, commonly called a 3M Scotchlock and the blue ones are the right size for this job. If you want to leave your old plug installed that will be fine, but you'll have to do a little work on the Scotchlock to make it work well. Open the Scotchlock and look inside, you'll see that the back wire channel has a stop in it. That's there for the way this splicer is normally used to tie a wire into a circuit. Since we're running two wires completely through we'll need to cut that little stop out of the way and tape up the original plug so it's contacts can't short to ground when it's tucked out of the way. Just place the two wires in the channels, close the Scotchlock, squeeze the metal piece down over the wires with common slip joint pliers, and snap closed the insulating cover. |
John
Dandy
(theAutoist
NOTE: John Weimer's new "nom de plume")