ZS Water
Chokes
![]() As
of: 20 November 2002
As
of: 20 November 2002 ![]()
__________________________________
The first thing is to make sure the 'choke' is heating up. With the engine at operating temperature, feel both hoses that are connected to the 'choke' housing. They should both:
(1) feel about the same temperature as the radiator hoses, and
(2) they should both feel the
same.
If
they don't, the problem could be nothing more than something clogged in a line
or fitting that's not letting the water circulate. This isn't very likely with
the sizes of the hoses etc., but if that's the case just drain some water and
remove the hoses at the housing. That is the most likely place to corrode
enough to hinder or stop water flow, and if it's clogged just clear it out.
| |
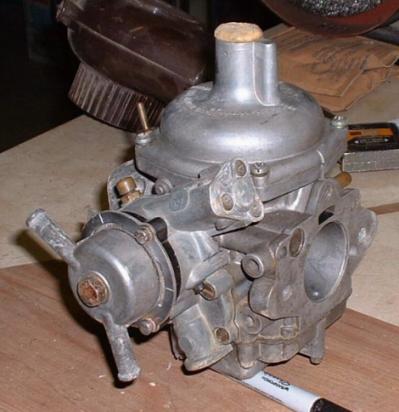
Next, look at the top of the housing. You should see 3 index marks lined up across the main body, black insulator, and thermostat spring housing. If they're not lined up, somebody has screwed that up; and, hard telling what else. The housing mark is the only one you should be able to move out of position. If it is out of position, but in sight, loosen the 3 screws retaining the housing and rotate it until the marks line up. If the mark is way out of position and the water hoses won't move far enough to align it, go to the bottom of this article, the paragraph beginning with, "Should you find.......". |
| |
Looking at the end of the housing you'll notice an orange (in this picture) appendage at about the 7:00 o'clock position. Open the throttle slightly, let it close, and feel the end of that appendage. A piston inside it should have moved out with it's top flush with or extending just a hair past the edge of that appendage/cylinder. If it does, we may be finished. If not, we have to go a little deeper. |
| |
At this point you should have exposed the black insulator with a tab sticking through a slotted hole. Hold the throttle open slightly and try moving that tab back and forth. It should move freely with a soft spring-like resistance going anti-clockwise before it's end of travel, and return quite freely to near the middle of the slot by that same spring pressure. If it doesn't, remove the black insulator. It is made of plastic so be careful with it. |
Now we're into the guts of the beast.
| |
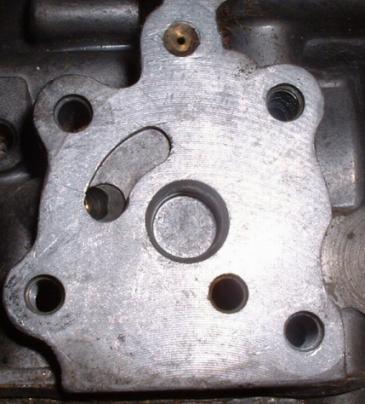
See that little c-clip in the middle? Don't mess with it! Everything should look like it does in the picture except you may find some gum or corrosion. If we've had to go this far there probably is some in there so let's get after it. |
 |
Right below this housing you'll find three screws holding it onto the carburetor body; remove them and the housing assembly. There are four ports cut and/or drilled into the back of the base. They and the mechanism inside the housing must be clean. Start spraying aerosol carburetor cleaner into the housing and clean up the mechanisms there. |
Wear safety glasses! That stuff can blow right back out and into your face and eyes.
| |
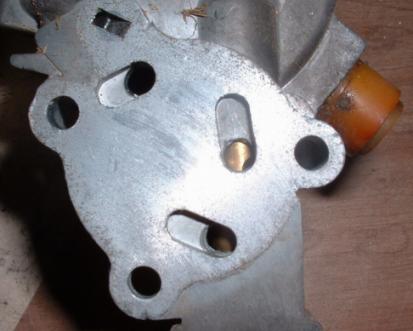
Note the correct position of the gasket when set against the carburetor body. |
 |
There are three ports in the carburetor body where the "choke" assembly mates up. The top one with a brass fitting is a vacuum port, the one at five o'clock leads to the float bowl, and the one at ten o'clock leads to the carburetor ventura. Give the top port a shot of carb cleaner while holding the straw tightly against it to assure that it is open. This is a tiny, but most important port. You may have to use a small piece of wire to help clear it. Something the size of a bristle from a wire brush will do. The port at five o'clock shouldn't be able to stop up, but give it a quick shot any way. Now we're ready for the ten o'clock port. |
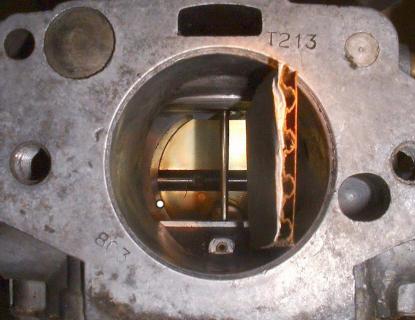 |
Cut a piece of cardboard to size and prop the throttle slide open with it. (Cardboard is clean and you can't loose it down the intake.) Inside the ten o'clock port you'll find a little brass jet. Hold the carb cleaner straw tightly into it and give it a shot. When it clears out you can see the cleaner enter the carburetor ventura behind the slide at the point marked by a white dot in the picture. |
| |
See that little brown plastic step cam with the arm on it in the foreground? It should be lightly spring loaded with it's arm against the lever it's touching in the picture. Open the throttle slightly, move the metal arm full clockwise, and things should look like the picture. Next move the metal arm anti-clockwise, open the throttle a little and the cam should snap it's arm toward or against the lever. If nobody has had that c-clip off it will work that way. |
Never remove that clip with the carburetor on the car. Some things will jump
out of place and are extremely hard to put back right. Finish up by
shooting some spray lubricating oil or penetrating oil in while working
everything as while cleaning.
__________________________________
| |
To test it just blow into it with a hair dryer turned on its highest setting. The spring should tend to coil tighter, or the squared loop on the end move clockwise. If it does, it's good to go. If not, it's broken and can't be repaired, only replaced. Failure of that spring is extremely rare. |
Before we button it up let's run one more check.
Crack the throttle open, rotate the metal arm in the body full clockwise, close the throttle, and check the position of the piston top in that orange appendage/cylinder mentioned earlier. It should be flush with, or extend just a hair past, the edge of that little cylinder.
__________________________________
To do that, first bring the engine up to full operating temperature. If it idles good we're finished. Drive! Enjoy!
If it doesn't, most likely the idle mixture has been enriched to try and
overcome the bad cold start/idle problem we just fixed.
| |
The idle mixture controls are found on the opposite side of the carburetor from where we've been working, there are actually two of them. The plastic nut is the course adjustment and the little screw in the middle of it is the fine adjustment. Either/both of them enrich the mixture when turned in (clockwise), and lean it when turned out. Seems backward but that's the way they work. |
If it, in fact, has been messed with, whomever did it probably didn't know what the little screw was for since it looks like a plug; and, when they attempted to turn it probably the nut turned instead.
Employing that assumption, start the engine and bring it up to operating temperature, rev it a few seconds to clear the plugs, and begin slowly turning the nut out (counter-clockwise). If the idle gets better continue until the idle falters then return it in to the best idle point.
You'll notice in the picture above, that the little screw is turned all the way in. This is wrong! So, we're going to start from scratch and reset the whole thing.
Begin by turning the nut all the way in to it's stop, and back it out 2 turns, turn the little screw in it to it's stop, and back it out 2-1/2 turns. Both adjustments are now at their mid points.
Bring the engine to operating temperature and rev it as before. Adjust the nut to best idle; then, while holding the nut, adjust the screw to best idle. Rev the engine a few seconds every couple of minutes to keep it cleared out while making the adjustments. When you have obtained best idle performance go to the idle speed adjustment screw at the throttle shaft and linkage area and adjust it to an idle speed of 850 RPM.
Happy motoring and "Safety Fast"!
John Dandy
(theAutoist
NOTE: John Weimer's new "nom de plume")